Recently there has been some demand for drumline apparel and custom t-shirts for marching percussion. I’ve decided to push this into several specific areas of marching percussion and drumming in general. There are even some colorguard and winterguard apparel as well! (I know how much winterguards like to keep it in the toaster.) If you don’t find what you like please feel free to contact me and let me know what you would like to see in the shop, whether it’s a design idea or just different clothing options for a current design. This selection of drumline apparel is not going to be found anywhere else online because it’s straight off the top of my head! These are all clothes that I think would be funny to see at a marching band rehearsal, so they do include some things that nobody else would understand. I think that’s awesome!
.
.
The best way to stay in time is to subdivide!
You know that, but why not let everyone else you meet know that too by wearing this in-your-face dutting tshirt everywhere you go!
Check out the apparel and merch section for tons of great drum shirts and accessories to wear to your next rehearsal. From things that the whole band will understand, to things that only the drummers will understand, and even things that nobody might understand!
Get your subdividing shirt right now!
.

.
This checklist of percussion essentials will help you find the best drumsticks and be prepared for anything related to drumming: Drumset, drumline, or concert percussion! These items are sorted by section, so check out what you might need by your instrument. Check the gear out below…
Photo credit: Leah Hetteberg
The Innovative Percussion drumset drumsticks are perfect for withstanding the durability test of the drumset and cymbals! These drumset drumsticks are good quality drumsticks for beginners and seasoned drummers alike. Designed for use on the drumset, these sticks have a nice steady taper and pronounced bead with a diameter that is standard for the industry (5A and 2B). A drum pad is a great investment for practicing at home without a drumset! You can simply use a pillow, or your bed, but the drum pad would be a little bit more realistic option, especially for working on good technique habits! You might also want a nice quality drumstick bag if you plan to bring multiple pairs of sticks to and from your lessons. The Innovative Percussion stick bag has several interior pockets for your sticks and is made of heavy-duty material that will keep your drumsticks safe!
In addition to the above items, you might want to buy a binder or folder, perhaps with some page protectors, a notebook, and a pencil. Drum keys are definitely a must-have item if you own your own drumset at home, this is how you tune each drum head. Everyone should also consider downloading a good phone metronome app.
Some other drumset items you may find useful would be a standalone metronome so you don’t have to rely on a phone app or worry about damaging it, a pair of cheaper headphones to practice with your metronome, a phillips head screwdriver for tuning your snare strainer, a quick and easy water bottle, a bright backpack that’s easy to find (for traveling to lessons or other locations with your gear), and a 14″ drum mute to put on your home’s snare drum and use it as a practice pad!
The IP FS-BK snare sticks are the marching snare drum best drumsticks because of their flattened bead. This flat bead allows the most surface area to contact the drum head when played. These will be your primary sticks and, though the minimum is one pair, you should consider buying at least two pairs. Tape these sticks in white stick-tape to cover the entire stick (minus the bead). Taping the whole stick allows for protection against back sticking rimshots as well as overall implement protection. The IP-1 General snare sticks are basically a smaller version of the main FS-BK stick (well, actually, the FS-BK’s are a bigger version of the IP-1 sticks). The bead is also flattened and will contact the drum head with the most surface area. Do not tape this stick at all, the stick is only used for lighter passages and will not be used for rimshots.
In addition to the above items, you will want to buy a binder with page protectors, a dot book, and a pencil. It is also recommended that you have a drum pad with you to use (but not required). High-tension drum keys are also optional as you may or may not be tuning your own drum (section leaders will decide this). A decent towel is always a good idea for when it rains and the equipment gets wet (and it will definitely rain), might want to get a light rain jacket too, and maybe even a dry bag for your sensitive gear! Everyone should also consider downloading a good phone metronome app.
Some other marching band essentials that you may find useful, but are not required would be an Information Packet book for a full understanding of how rehearsals are run, a standalone metronome so you don’t have to rely on a phone app or worry about damaging it, a pair of cheaper headphones to practice with your metronome, a phillips head screwdriver for tuning your snare strainer, a quick and easy water bottle, a bright backpack that’s easy to find, a 14″ drum mute to put on your drum and use it as a practice pad, and if you’re feeling adventurous you can buy a GoPro with a drum mount! (Check out the GoPro and drum mount article to learn even more.)
The TS-2 nylon-tipped tenor sticks are the best drumsticks for tenor drummers since they allow for a much more controlled sound compared to the FT-1 tenor mallet. These are both great implements for tenor drummers to use. The sticks are easier to move because they are lighter and more versatile but the mallets create a full quality sound at every dynamic. Use the white stick tape to cover below the tip to about 1/3 of the way down the neck. You will not be playing rimshots with the butts of these sticks so they do not have to be taped the whole way down. These sticks should last an entire season so you may get by with only ordering one pair.
In addition to the above items, you will want to buy a binder with page protectors, a dot book, and a pencil. It is also recommended that you have a drum pad with you to use (but not required). High-tension drum keys are also optional as you may or may not be tuning your own drum (section leaders will decide this). A decent towel is always a good idea for when it rains and the equipment gets wet (and it will definitely rain), might want to get a light rain jacket too, and maybe even a dry bag for your sensitive gear! Everyone should also consider downloading a good phone metronome app.
Some other marching band essentials that you may find useful, but are not required would be an Information Packet book for a full understanding of how rehearsals are run, the Quadratics book for a better understanding of the tenor drums, a standalone metronome so you don’t have to rely on a phone app or worry about damaging it, a crescent wrench for adjusting and fixing your tenors or carrier, a pair of cheaper headphones to practice with your metronome, a quick and easy water bottle, a bright backpack that’s easy to find, a full tenor drum pad to be able to practice at home without bringing the drums, a 12″ drum mute to put on drum 2 and use it as a practice pad, and if you’re feeling adventurous you can buy a GoPro with a drum mount! (Check out the GoPro and drum mount article to learn even more.)
When you are given your mallets (shown below) you should tape them using white, or sometimes black, stick tape. Tape from below the bead/mallet head to about 1/3 the way down. We don’t ever use the butts of these mallets so protection below that point is not necessary. The bassline uses black tape so that the mallet can easily be seen from far away, this makes it easier to correct if it is not in the center (allowing for earlier muscle memory).
In addition to the above items, you will want to buy a binder with page protectors, a dot book, and a pencil. It is also recommended that you have a drum pad with you to use (but not required). High-tension drum keys are also optional as you may or may not be tuning your own drum (section leaders will decide this). A decent towel is always a good idea for when it rains and the equipment gets wet (and it will definitely rain), might want to get a light rain jacket too, and maybe even a dry bag for your sensitive gear! Everyone should also consider downloading a good phone metronome app.
Some other marching band essentials that you may find useful, but are not required would be an Information Packet book for a full understanding of how rehearsals are run, a standalone metronome so you don’t have to rely on a phone app or worry about damaging it, a crescent wrench for adjusting and fixing your drum or carrier, a pair of cheaper headphones to practice with your metronome, a drum pad for practicing and auditioning for the snare or tenor line, drumsticks for practicing and auditioning for the snare or tenor line, a quick and easy water bottle, a bright backpack that’s easy to find, and if you’re feeling adventurous you can buy a GoPro with a drum mount! (Check out the GoPro and drum mount article to learn even more.)
You will want to buy a binder with page protectors, and a pencil. Timpanists may want to purchase their own tuner, but is not a requirement. Drum keys are optional as you may or may not be tuning the accessory drums (section leaders will decide this). A decent towel is always a good idea for when it rains and the equipment gets wet (and it will definitely rain), might want to get a light rain jacket too, and maybe even a dry bag for your sensitive gear! Everyone should also consider downloading a good phone metronome app.
Some other marching band essentials that you may find useful, but are not required would be an Information Packet book for a full understanding of how rehearsals are run, a standalone metronome so you don’t have to rely on a phone app or worry about damaging it, a pair of cheaper headphones to practice with your metronome, a drum pad for practicing and auditioning for the drumline, drumsticks for practicing and auditioning for the drumline, a quick and easy water bottle, a bright backpack that’s easy to find, and if you’re feeling adventurous you can buy a GoPro with a drum mount! (Check out the GoPro and drum mount article to learn even more.)
Please make sure you have the right items you need. Practicing with the wrong implements, or without certain implements, will negatively affect the learning process because your technique could drastically change. You should also make sure to have spare sticks or mallets because they may break or become damaged due to the nature of the activity.
If you have any questions feel free to contact me!
 In the spirit of more free drumline music, we’ve just added three new free drumline cadences, drumline street beats, and drum cadences for drummers at all ability levels. From beginner to advanced, that’s a total of nine drum cadences added for you for free! Check out the free drumline exercise and music page to download them.
With four main drum cadences included for free on the drumline warmups page, as well as in the pre-built instructional packet, that makes 85 free marching percussion warmups and exercises altogether. 98 if you include the free drumset exercises as well! Wow, that’s a lot of free drum music! But if you ever feel like you need more, don’t hesitate to make a request here too. Let’s dive into the drum cadences on this site and see what will work best for your ensemble.
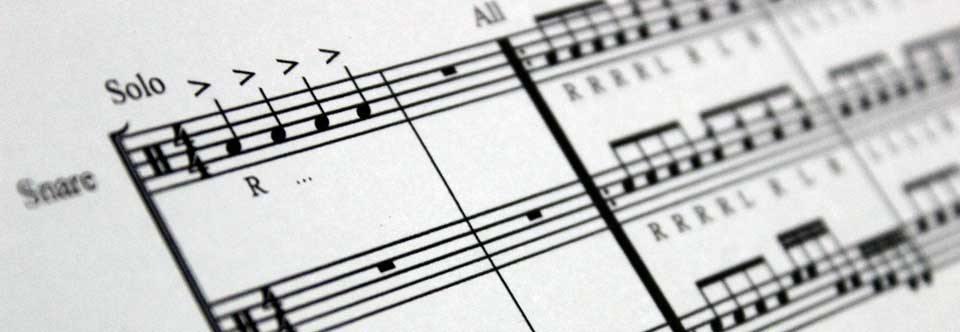
Yellow Lines drumline street beat. This is the simplest cadence that was written with beginning drummers in mind. This sheet music, like the others, is divided into three skill levels of drumming but overall the difficulty is low, even for the advanced version. This street beat explores some simple metric modulations, press rolls, straight-forward accent patterns and shaping, and some basic syncopated rhythms to march over. This one is shorter which means the drumline will probably end up playing it multiple times in a row (which will be good for them to have many repetitions). It’s also fun to play! There are a bunch of snare rim shots, tenor simple but still interesting around patterns, and a nice bass drum groove at measure 14 that they’ll enjoy playing. This is also enjoyable for the audience to hear while you keep time for the band. For the band, this street beat is also pretty easy to march along with since there are no surprises with time signatures or rhythms. Check out Yellow Lines if you’re group is young or new to drumming!
Pretzel Coat drumline cadence. This next cadence is also fairly simple but does explore a little bit more advanced elements that are introduced sporadically. Overall this cadence is rated as a low-medium level for the beginner, intermediate, and advanced players at that general ability level. The step up from the previous drumline street beat is the diddles and rhythm choices primarily. Syncopation is a little more challenging in parts and the accent patterns and shaping are more musical. There’s a nice loud section that the performers will enjoy and should get the crowd’s attention too! The repeated phrase make this cadence a bit longer than the previous one and you’ll still probably find yourself playing this twice in a row for parades. A roll-off has also been added to the end for parades where the band needs to be signaled to begin the show tune. Check out Pretzel Coat as another fun drumline cadence!
Escape Goat drum cadence. We’ve moved into the next level overall. The average difficulty of these three cadences is about a medium. If you have a drumline that’s a little more experienced this might be the street beat for you. It’s only a little more involved than the previous one, adding quicker diddles, modulations, flam passages, and syncopated rhythms in modest doses. It also goes over the barline for a couple of phrase endings which adds interest and hides the straight time signature. Marching to this one is still fairly normal provided the band understands where the barlines fall. This drumline street beat is also a little longer still, utilizing two repeated groove phrases that the performers should enjoy. Once again we find a roll-off at the end signaled by the center snare’s rimshot cue. Escape Goat is a nice middle-of-the-road drumline cadence (see what I did there?) Enjoy!
Osciller drumline cadence. This is a throwback drumline street beat that has been given a fresh take! Of the four main cadences, this one is the highest level of difficulty. The beginner and advanced versions maybe have the biggest divide in terms of ability level, you may be interested in trying this cadence if you have an experienced or veteran drumline. You may even decide to push your ensemble with a challenge using the beginner version of this cadence and might be pleasantly surprised. This is a fun street beat and often times performers will gravitate to practicing what they enjoy playing themselves. Osciller adds harder diddle and flam passages, bass drum split parts, tenor drum choices and patters, and of course it’s much longer than the others. The grooves are more fun to play and longer lasting for the audience and it gets loud forever at the end! What’s not to like?! The silence at the end might be tricky to march to for the band, but that will come with time once they understand how it works. Again, that may be part of the decision-making process in choosing to use this cadence or not. The best part about this cadence is that even the advanced version is realistic in terms of playability, we’re not trying to displace triplets over a barline or anything! With a decent drumline and some practice this cadence, and all the free drumline warmups on this website, are very doable even at the advanced level! So check out Osciller for your next drumline street beat!
Well, that about does it for now. Four full free drumline cadences and 12 different versions for every possible ability level! There’s always more where that came from though, so be sure to bookmark this site, or better yet, subscribe to email updates for newly added content! You can even request free warmups for future updates! Feel free to contact me with any questions that might come up, I hope there are no typos in the sheet music, but if there is I’d love to get it corrected! Thanks to everyone for checking out my material and using it with your group or just playing it at home! Can’t wait to write some more, so keep an eye out for some additional drumline cadences in the future!

If you’re looking for a winter guard music edit or a winter guard soundtrack and need the best price you’ve found it! Guards rely so heavily on their music that it’s important to make sure the quality is high and the editing is perfect. However, the show music also needs to be competitive, which is why you want to work with an experienced sound designer to create your sound. Patrick R. F. Blakley at WinterguardMusic.com has been performing, directing, judging, and designing show music for WGI groups for almost 30 years! His sites offer free and paid winter guard audio edits for guards competing at WGI and state circuits! The sound design is incredible and working together is easy, so let’s get started today! Continue reading to find out which winter guard music edit options are right for your group.
The free WGI audio edit option is available here. This option is great for younger winterguards that don’t need major music edits but might need the songs trimmed down to the correct length. This option also works perfectly for groups that want to perform a few songs as a compilation without intricate audio edits within each song itself. The free winter guard music and winter guard soundtracks option is not necessarily designed for advanced groups who will usually prefer more effect-oriented edits with a distinct musical direction. That being said, any groups who fit the criteria are eligible for free WGI music edits. Here are the requirements: Your group must perform at a state winterguard circuit competition or any WGI event. The requested WGI show music cannot contain any internal edits or corrections, only trimming to length or creating a compilation of two or more songs. That’s it! If you meet those simple requirements we can get you some free winter guard show music! Use the link above to submit a free music request!
The paid WGI audio edit option is available here. This option is intended for winter guards who are established and competitive within their class. I’ve worked with guards from every class to create award-winning WGI music! You can hear the samples on the paid WGI soundtrack page. The paid winter guard show music package is popular with both scholastic and independent ensembles and ranges from basic edits within a single song to seamlessly incorporating several songs with edits within each one. These shows are also trimmed to the desired length. On top of that, any amount of simple revisions is free of charge, and I will continue to work with you and your designers throughout the entirety of the season. Did a judge make you want to extend some choreography? The music can be extended as well! Did you think of a brilliant idea just a week before the end of the season? The music can be edited then too! Think of this package as hiring an on-staff sound designer who is on call for your music needs, all for the lowest price for winter guard music online! That’s guaranteed! If you find a lower price for your show edit send me a message, I’ll beat it while matching or exceeding the quality! To get started with a paid winterguard show edit submit a request for here!

Hey, marching band director! If you’ve gone through the marching band or indoor drumline loop as a director before you already know this drumline checklist will help. If you’ve even started your own spreadsheet then you’re on the right track! This article will highlight the biggest elements of the drumline’s season for both marching band and indoor drumline / percussive theater. From the drumline warmups to hosting a show at your school, this checklist will keep you on the rails and hopefully reduce the stress level for everyone. Not only that, but this should all have a positive effect on your groups success as percussionists as well, especially since you can focus more time on the drumming and not the logistics!
So let’s break this checklist down into its component parts and walk ourselves through an entire season. Each of these checklist items has several secondary items and, beyond that, each circuit is different. Generally, this list will help you stay on track regardless of the small nuances of each state or national circuit. Some of these items will simply remind you of other things you need to remember that are unique to your school or ensemble. So let’s take a look at the framework of what will create a successful season.
Watch the first step, it’s a doozy! We’ve gotta get the whole season started! Your design team needs to work with you to choose a compelling show theme or concept that will be successful for your performers. If you’ve worked with this ensemble in the past you’ll have a general idea of their capabilities overall, so push them a little bit more if possible and keep the momentum moving forward. If you’re new to the ensemble you’ll have to rely more on the staff to establish a benchmark of where the group’s ability level sits. Sometimes a very specific show concept can be difficult to portray for a young ensemble, but with a veteran group you might want to do more than just a generic simple theme. Keep this in mind while discussing things at your staff meetings.
Once the show is decided you’ll need to get the band and drumline music written (and warmups too). The music can be purchased online with pre-made shows available all over the web. Places like Box 6, Standing O, or MSconcepts are places I’ve worked with in the past that have been a good experience for my young groups. These shows can cost thousands of dollars, so be warned, but if you’re confident in your abilities feel free to write the show yourself, or source it to your staff. Writing a show yourself can be tricky to navigate because not only does it need to make sense musically, but you also need to be able to communicate certain criteria to the judges through the music itself. This can be time-consuming but might be the smartest option if you know your group well.
Having to edit a pre-bought show isn’t fun when you’ve paid a lot of money for it but still need to write music. This issue is predominant if your band is strong but the percussion is weak, or the opposite. Pre-written shows tend to have just a single difficulty rating, and that isn’t broken down into individual sections. Some companies will re-write some of the music for you though, so keep that in mind! You should also keep in mind that something rated lower difficulty on a national level may still be fairly hard at a local circuit. If Jeff Queen is writing your drum book ‘easy’ for him is different than ‘easy’ for Bobby who joined because his friends are in your band. When considering show music (or writing your own) look through the judge’s criteria and caption considerations for your circuit. You’ll want to keep those in mind as your explore your show. By the way, if you need a pre-made percussion warmup packet I’ve got you covered!
Lastly, and probably the most important step, you need to discuss overall goals for the season. I have been on too many staffs over the years that just showed up to practice and just practiced then went home. I guess the goal was to be a marching band and boy did we achieve it! You’d be much better off with an overall set of goals for the season as well as a goal for each rehearsal. These goals don’t need to be profound, just simply give direction and something that everyone can focus toward, students and staff alike. Season goals could be simple things like improving our pyramid of sound from last year, focusing more on feet timing to get everyone’s feet exact, or fine-tuning the small things and trying to move up a class.
You could obviously set a goal of just winning, but at the end of the season winning is not the most important thing for your performers. Growth might instead be a better abstract goal. Setting goals for individual rehearsals is an even more concrete endeavor. Be able to play up to measure 51. Play the opener from memory by the end of practice. Get through a full run-through with the battery and pit. You could even add multiple goals and try to push to achieve your stretch goal. Perhaps the band knocked it out of the park and you have more time to review some extra comments from a judge or implement a change that might not have been started until next week! Write these goals on a big whiteboard for everyone at rehearsal to see, maybe alongside the schedule. (Oh yea, MAKE A SCHEDULE for each rehearsal!)
This one might be the easiest step of them all. Send out reminders, post fliers in the band room, get a message on the morning announcements at school, and hype the show at other fine arts rehearsals that are currently wrapping up. Here’s an idea for recruiting: Send a personal letter in the mail to any musicians in the school that would be first-year eligible for your group. Tell them you selected them personally to join the band based on their abilities in the school’s music program. Do this for everyone in that grade! They’ve all been hand-picked! Let’s get your numbers up! (A large young group will eventually become a large veteran group!)
If you work in the school district you will hopefully see a lot of your group’s students as well, let them spread a rumor or two. Tell them you might be using a huge prop this year, or that someone is going to roll a gong all around the field in the show. If nothing else, it’ll spread awareness of the season and might bring more people to your first meeting to hear about this crazy gong idea. Now, at the meeting, it’s your time to hook them! Create a presentation with pictures if possible. Show them the uniform ideas, the prop ideas, play the music for them (I was always the most excited for the music), and then tell them about the trips and season goals. The opening meeting is all about generating excitement for the membership and answering questions from the parents and students as well. See, you’re not done recruiting yet, this meeting is also another tool to spark more interest.
Next, some groups hold auditions. Other groups take everyone that joins. Either way, you need to decide who is good at what. Wind players may already have their music, you can sometimes hand that out at the first meeting! If they’re excited they’ll start learning it immediately. Percussionists might not be able to start learning show music until you tell everyone what section of the battery or pit they’ll be in. This audition and placement process needs to be as efficient as possible. Give them a rudiment sheet, a section of show music, and a warmup or two. These things will be their focus to show you what they’re made of.
Don’t give them too much, or you might spread them too thin (especially the younger ones). If they’ve never played drums before consider if they’ll need to gain some experience in the pit for a season without having to march around the field. You also need to consider if you want to put all your strongest players on snare or tenor (or bass), or if you’d prefer a more balanced drumline. Having a strong snareline and weaker tenor and bass sections means the demand of what they’re playing will be very high in contrast. If you have a balanced drumline it’ll be less contrast but probably won’t have anyone playing inverted cheeses as a section. But hey, that’s okay! Judges don’t have an ‘inverted cheese’ checkbox on their sheets, so if the drumline keeps time and plays together things will be good!
Are you still auditioning? We gotta wrap this up! It’s a good idea to introduce your technique outlook during or immediately after auditions. If you introduce it during auditions you might negatively affect the student’s audition performance since they may be thinking about a new technique idea you’ve just introduced. Introducing the overall technique elements after auditions allows the line to hash through them together without nerves in play. Again, if you don’t have an established technique outline I’ve got you covered! Now, we have to get this drumline set (and band too if you haven’t already). The sooner the line is set the sooner they can start learning the relevant music!
Don’t forget to have them move with the drums on during this process too. Wearing the drum is sometimes a bit jarring for newer members, so getting used to that early is a plus. On that same note though, take lots of breaks! Don’t overcook your drummers right off the bat, you want them to enjoy the activity as much as you do, and I hope that’s a lot! Let them have some fun while learning the instruments and that will help condition them to understand what it means to perform the instrument. If they enjoy what they’re doing you’ll see it in their faces and their performance mode has a head start.
Try to get the performers to have the warmups memorized as quickly as possible. The show music is what they’re going to want to focus on at home, so give them a clear goal with the warmups so that the music doesn’t dominate their practice time. You’ll also want to give them a list of things to start acquiring, like sticks, binders, page protectors, tape, etc. If you don’t feel like taking the extra time to make this list I already did it for you!
This is also a good time to lean on the veteran performers to have them help the young ones. Getting information from you is all well and good, but when the young ones get information from their peers, especially the ones they look up to, it’ll be a little more meaningful and should give a boost in results! Keep in mind that the veteran performer benefits from this too, they know the drumline (and full band) is only as strong as the weakest link. If the veteran member helps the newbies it will reduce the contrast between ability levels slightly and give the entire ensemble an edge!
Back to reality! It’s fun to hang out in the fantasy world of your theme or show concept while writing the music or the drill and exploring new ideas and how to implement them. But here we are, back in reality. We need to finalize this competition schedule. By now you’ve probably seen the circuit’s available show list. Some big circuits have multiple competitions in a weekend while smaller circuits may only have a single competition option. For circuits with multiple show sites to choose from see if you can get the provisional attending band list. Many places have tentative signups posted for all drumline and marching band directors to see.
You want to make note of your competition (because you’re not directly competing with all the groups in attendance, just your class). Is there a group that’s so dominant they’re going to beat everyone by ten points? You might want to avoid them early season so that your score isn’t ‘slotted’ and pegged to a lower number. This doesn’t always happen, but sometimes judges inadvertently ‘leave room’ at the top when managing numbers. Perhaps this is just something to be superstitious about. What about a group that you think you’ll be super competitive with all season, maybe you want to try to go head-to-head with them as much as possible. Is there a weekend when nobody in your class is competing? Take advantage of this by choosing a show site that you think you can pop a big number, way above the other classes! You may also have to decide what’s more important a long camp weekend of rehearsals where tons of progress can be made, or a show site that doesn’t have direct competition but allows for a low-pressure ‘practice’ show.
Speaking of low-pressure performances, if your school has a football team you need to try to perform at halftime for all their Friday home games! These performances should be in uniform and allow you to get a free exhibition run of the show with literally no pressure. The fans are usually keen to get a hot dog during halftime, so the pressure is turned completely off! Best still, these exhibitions on Friday are literally a day before the real deal. This means that any changes made this week can be demonstrated the day prior to being judged, and you’ll usually have a Saturday rehearsal to polish anything sticking out in the halftime run-through.
Buses, bands need buses, and sometimes a lot of them. Most school districts have software or a website to log in and reserve school buses for extracurricular activities. Do this as soon as you’re confident about the show schedule so that there aren’t any surprises on show day! Don’t forget to give yourself plenty of flex time during travel in case there’s traffic or problems loading, etc. The last thing you want is for your students to be flustered while rushing to the stadium directly from the buses to perform on time. We’ve all been there, it doesn’t bode well for your score!
Independent groups will have a harder time with this step sometimes, you’ll need to rent a bus service and make sure they’re reliable. Set an exact pickup point and be sure to tell them to be there at 2:50 pm if you want them to be there at 3:00 pm. Lastly, check on the status of the buses regularly to make sure nothing changed, or if it did change that things are updated properly. Out of all my years of directing, the buses and travel time were one of my biggest stress factors! See if you can designate someone on your staff to help keep this all in check. This whole checklist should be run by multiple people, not just you!
If you’re planning a big trip to an out-of-state competition or regional event you’ll need to plan an entire itinerary. This is usually where the band booster can help a ton! Tell them the information you know about addresses, times, prelims/finals logistics, and maybe even some ideas for the trip like food and group sightseeing. Then let them run with it. You should hopefully be able to focus more on the music and show aspects of the season and let the trip itinerary be peripheral. Spot-check the itinerary as it’s developed and talk about trip logistics at every band booster meeting (along with the home show if applicable).
Leave room for error in the itinerary as well, flex time, etc. It’s totally fine to spend a few hours in the hotel if things go smoothly, so don’t jam-pack the schedule! Again, you should be mostly concerned with competition logistics, so let them set you up for success around the show, then just enjoy the trip as the booster run it! If you perform at finals on Saturday night then your trip was already a success and your stress level should go down from there. You don’t need to worry about the bridge construction on the way to sightseeing!
The early season audition process is complete, the members have the early show memorized, it’s time to learn the drill you wrote! But first, you need to write it! Don’t get behind on this step, things will happen fast. You should already have an idea of what the drill will be doing while you’re writing or choosing the music. You don’t know the drumline or band’s exact numbers yet, but you should have ideas in your head still, and preferably on paper. The second your group’s numbers are clear you need to get the drill process officially started!
If you’re writing the drill you can start to assign drill numbers to the members specifically, maybe even keep the talkative ones apart from each other. If someone else is writing the drill, make sure they have the updated music recordings (you should record your run-throughs in the lot as soon as possible so that the drill doesn’t miss a change you made a month ago). Make sure to submit your chicken-scratch ideas to the drill writer to keep the overall plan in place.
Keep in mind that membership often changes, some students quit, some get hurt, and others might have a wedding to go to on your second competition date! This is all good info to remember when writing the drill, try to leave room for issues like this. If you’re creating long flowing arcs these issues can be absorbed by sliding everyone in toward the center by a space. If you’re doing some box drill or grids you may need a backup plan or two throughout the season. You do NOT want to march with holes at a competition, they’re distracting and visual judges will either call them out or just see overall spacing issues caused by a hole. Does this mean you need to spend the entire second week of competitions closing that one hole on the field? Probably not, but can you write that person on the ends of the forms as much as possible? Yes, that’s much more achievable and realistic.
Now, if someone quits the day before a show, well tough luck, you might be spending some rehearsal time Saturday closing some key spots on the field. Again, you need to decide what’s more important here, closing a single hole throughout the show or fixing the front-to-back timing issue that keeps happening. Be smart about what you fix, not everything is weighted the same! And frankly, not everything needs to be fixed early competition season, judges don’t expect you to be perfect off the bat. If you stand still while playing the entire closer you’ll have a judge note the improvements if they see you again next week. Now, do you want to stand still and play music for a few minutes or just cut the show that much shorter and end on song three instead of song four? Again, an executive decision that you need to decide.
Remember, what are our goals for the season? We made those goals for a reason, so what decision makes the most sense in regard to those season-long targets? Trust yourself and be confident with your decisions. Don’t go back and forth, take a moment to think hard about it and stick to your decision. You know what you’re doing, you got this!
Remember as you read through this checklist that we’re talking about competition season and traffic during out-of-state trips, but these are all future planning things. Even at checklist item #6 we’re still way back at early-season stuff! Ideally, this step takes place as soon as each section of the band can play through a song or two in full. Yea, this is like week two of the season! But now, keep in mind that each step can be expanded through the season as well, so here we’ll be talking about memorizing music, but as the season progresses we can still talk about memorizing music toward the end of the season when things like changes are made or wrong pitches are discovered! So this checklist can also be used as a re-checklist too! Revisit these things a few times throughout the season, it might even help you remember something you forgot to do early on in the season!
The first full ensemble rehearsal is special, it’s probably my favorite part of the season! Hearing the music altogether, the atmosphere of full ensemble rehearsal etiquette, and learning the true potential of the show and performers! It’s so much fun to be a part of, and standing right in the wind arc is the best seat in the house! Now, this also comes with several potential challenges as well, so don’t put your feet up yet. For the very first full ensemble rehearsal, you’ll need to remind them of rehearsal etiquette and teach them that full ensemble etiquette is the most important. Now is also the time to teach the band how to listen back to the drumline for tempo, up until now they’ve been (hopefully) listening back to a metronome, but the drumline can be way different!
While you should still be using a metronome through the entire first ensemble rehearsal, it can be quite distracting for wind players to now hear a drumline between them and the met. This is a good time to for them to get comfortable relying on the drumline and letting the drumline listen back to the metronome. That’s way easier said than done! First, the winds need to start to understand the drumline’s parts, they aren’t just playing quarter notes back there. So the clarinet section is going to have to have some understanding of where the downbeat is after a triplet double-stroke roll. The metronome will help translate that for now, but soon we need to take the metronome away so it isn’t a crutch. That will all certainly come with time.
As the season progresses, don’t lose sight of the importance of an ensemble music arc. Some of the tempo issues you’re having might just be because the winds don’t understand a drumline musical change yet. You could even do the ensemble music arc while standing in the drill set on the field once we know the drill. This will also help us work through the different listening situations on the field, the drumline isn’t always going to be directly behind the tubas! Once again, these things can all go on the whiteboard as goals for rehearsal.
If we’ve done everything in chronological order from this checklist so far we should be about 2-3 weeks into rehearsals. Maybe even sooner depending on the band size or ability level. If your group is absolutely nailing ensemble rehearsal they need to be on the field learning drill the next day! It’s also alright if the drumline doesn’t learn drill with them right away, the drumline can learn the drill at their own pace since they’re probably still working on memorizing the music (remember we set the line later for the drumline than the winds). Keep in mind that the drumline is also sometimes learning an entirely new instrument, unlike Johnny who’s been playing the same trumpet since 4th grade. Playing a marching bass drum is not the same as playing percussion in school, it’s similar, but definitely takes a lot to get used to it!
As the band or drumline chunks through the new drill make sure they know how it fits with the music right away. They should be learning the drill with their music binders in hand to reference the music. Sing the part each time while moving, loud and proud! Once a phrase or two of drill is learned it’s time to grab the instruments! Play a set in place, then play it on the move. Don’t neglect marching technique as well as playing technique here. If they learn the drill with improper technique then it will stick! The same goes for learning music too, you don’t want to have to take time and undo bad habits, take the time to learn everything with good habits! Repeat the phrase with the drill a few extra times, then push into the next phrase.
Once we get really comfortable learning drill we should be able to learn the drill with the instruments in hand. Learn a phrase and play it without having to run to the sideline to pick up the instruments. By the end of the season, we’ll need to be able to make changes to the drill on the fly, so learn those skills now and the band will thrive on those good habits later. Once a full song is learned with the drill go back to play and move a quarter of it, then stop to think about what comes next. Play and move the second quarter of the tune and stop again. Give them time to think and check sets as you progress through the song like this until you get through it all. Then, finally, go back and run the chart! This is the way each song should be learned and retained. Small chunks, big chunks, whole song.
This step is the most generic step, and also the biggest chunk of time during the season. We’re trying to thread a needle here because we want the show to be as complete as possible before we start competing, but we also don’t want to rush through and spread everyone too thin. If you start adding bodywork and big developed visual moments into a show too early, you may be sacrificing the music. If you push through the entire show from top to bottom before the first competition, you may have weak spots throughout the show that wouldn’t be as weak if you didn’t perform the last song at the first competition.
These are just things to consider since each ensemble is different and some groups are ready for bodywork right away while holding their own on the music, and some just aren’t. The idea here though is that it’s a marathon, not a sprint. The endpoint of the season is at championships, so work your goals steadily toward that date. However, we also have to be realistic in that you want feedback from the judges right away on as much material as possible. You also know that judges will note improvements if you see them multiple times throughout the season. That being said, you’ll have a choice to make (and a different choice for each show element) about what is more important.
The judges will note improvements whether you come out with a completed show or not. Effect judges may not be able to give you credit for certain things early season if you hold back though. Again, all choices you need to think about during this large chunk of the season, between learning drill and competing at the first show. Heck, maybe you don’t even go to the first competition! Take another week to prepare and come out stronger in week two. These are all ideas that groups have utilized in the past and will continue to do so in the future. You might even come up with a combination of these ideas where perhaps the drumline doesn’t play the last tune, or maybe they play it in place while the band moves around the field. Sometimes you’ll need to get clever!
Best of all though, after the competition, you’ll be able to talk to the judges and discuss some of these things with them. Are the things you’re doing on the field coming across the way they were intended? Are there major design flaws within a caption that are being missed? Is it worth adding more show elements before dissecting and fixing others? Some of these answers will come while listening to the judges’ feedback on their recordings, others you can ask them directly at critique. Gain as much information as possible to make the best decisions for your group here. Try to avoid snap decisions from the heart and instead employ your head. What will bring the group the most success? Use that information the next week and revisit the questions you have once more. This is all part of the process of becoming complete!
Finally, once you are complete it’s time to rep, rep, rep. Repetitions will highlight consistencies. As you push to the final weeks of the season you’ll need to decide when to stop making changes and just polish instead. I used to have a rule of no changes in the last week. Take what’s there and only clean it up. Obviously, you want to be cleaning throughout the season, but implementing changes at the end of a season will negatively affect clarity and sometimes your numbers depend solely on music and visual clarity! We’ll revisit this more on step #10.
So you signed up to host a show? Well, I hope you’re prepared! This is going to be the real bread and butter of this article since home show logistics can be a nightmare and planning out each home show can be the most stressful part of the season for a drumline or marching band director. This step will be broken down into a handful of secondary steps. Here is what’s involved with preparing for a home show:
If this is your group’s first year hosting a marching band or indoor percussion show, you’ll want to make sure you apply with all the correct information to the circuit. If your school has hosted a show in the past it’s likely that all this information will be on file, but you’ll still need to apply each season as a show host. Normally applying requires taking measurements (especially indoor shows) for the performance area, door widths, etc. You’ll want to have a few dates available when you apply, so coordinate that with the building manager to make sure the building isn’t needed for something else that day, or already signed out to a different event.
If the circuit accepts your submission and grants you a date you’ll need to confirm again with the building manager to make sure they know the correct date is set in stone! Again, you’ll need the entire building to yourself, for indoor our outdoor shows. Indoor shows will require the use of the entire main level of the building since percussion equipment isn’t easy to move up and down elevators. For outdoor shows, you’ll still need to plan for a rain event which may require the show to move indoors. The best part of hosting both outdoor AND indoor shows is that the maps for the indoor show can be used for when an outdoor show gets put inside due to rain!
Next, you’ll need a map of the outdoor campus with labeled parking and warmup areas. For indoor shows, you’ll also need an interior map of the building as well as a gym floor diagram. For the indoor show, you’ll need the campus parking map to show where spectators park, equipment is unloaded, buses are unloaded, handicapped parking and entrances are located, and where the buses and trucks can park during the show. Your interior maps need to label each classroom that will be used by the visiting ensembles, the warmup areas, and the pathway to get around the building smoothly. Note that indoor drumlines and pits move around like huge trains in a hallway, slowly and awkwardly. Make sure there will be no trainwrecks! Plan accordingly.
You’ll want to also get a list of the classrooms available to let the ensembles use. The best way to get this map and get the room numbers all at once is to find a fire escape map. Usually, the school has this digitally, but in the worst-case scenario, you can just take a picture of one that’s in the hallway! Plan on making a list of all the available classrooms and write down which ensemble should go in which room. Sometimes ensembles are allowed to use two adjacent rooms, while other times they just use one. If you have two wings of classrooms available, try to alternate between wings using the performance order so that traveling through the hallway is a little more spread out. When you ultimately send your maps to the circuit’s other indoor or marching band directors attending your show, including a list of room numbers with the ensemble names so they can plan their route before seeing everything in person!
After this legwork is done you’re going to need some help. If you haven’t already, start bringing up the home show at booster meetings and talk about planning and checklists as early as possible! You’ll need a few team members to help you out since you’re also presumably still trying to teach your ensemble in the middle of everything. Someone will need to be in charge of setting up the school, someone can be in charge of programs, and you’ll need someone to contact the EMT and resource officers, order trophies, and a liaison for the judges. Start to brainstorm ways to get some volunteers too!
Once you have your paperwork sorted out with maps, classrooms, building flow, gym measurements, and directions (and anything related to outdoor shows like prop storage, bus parking, etc), you can send it to the circuit to distribute to the visiting ensembles. This is usually done 2-3 weeks in advance, so make sure to proofread everything and walk the building one more time just in case! LOOK IN THE CLASSROOMS! Make sure you didn’t accidentally give a group a closet, or worse, a computer lab that you can’t move the tables out of the way! You should also try to avoid using technology department rooms because there is usually machinery in them. You just want some boring classrooms for everyone! Double-check the building’s address and make sure that’s included too!
You should already be planning out a home show program since you designated a team member for this specifically at the last booster meeting. It’s usually a fun idea to let a student design the cover, but you’ll need to include the show write-ups for the competing ensembles, a welcome letter, and hopefully a whole bunch of ads! Most groups use their home show to make money, so use your students to fundraise their dues and sell program ad space for a good chunk of money! A percentage of the ad space sold would go to the student who sold it and the rest would go toward printing the programs and back to the boosters’ savings account to support the ensemble. Make sure you print enough programs because you don’t want to sell out (if you sell out it means you could’ve made more money on them). Ideally, you’ll want to sell them for as cheap as possible and only have a few left over at the end of the event. See if you can figure out how many they printed last year, compare the number of groups in attendance, and how many they sold. This is all great info to keep track of for next season! Now, just find a local print shop to make them at a great price and have them ready to go on show day.
With all the people involved with this home show, someone needs to know an announcer or a friend that is willing to be the MC for the show. Announcing is a show isn’t too tricky, but if you make them a script it’s even easier! Most circuits will require the announcer to say the exact same thing for each group, so this should help if someone is a bit hesitant. If you really can’t find someone try telling the students that if a parent volunteers you’ll put a good amount of money toward their dues. You’ll also need to reserve an EMT and a resource officer to be on campus for the event (sometimes more than one depending on the event size). Now is also the time to solidify as many volunteers as possible for the show day setup and the event itself. Go back to that list you started and get in touch with people everyone has been mentioning. Schools have clubs that need community service hours, so this will definitely count toward that! 4H clubs and Honor Societies are great places to start.
Speaking of volunteers, we need people to handle the concessions! Show concessions is probably the best money-maker in all of marching band and indoor drumline! It’s simple, buy a bunch of local pizzas (make sure to warn them that you’ll be doing this in advance). See if the pizza joint will give you a discount for including a free ad in the program! Sell each slice for a few bucks, and discount the price halfway through the show. Canned soda, snacks, baked goods, and anything else people want to serve is a good idea.
Depending on the circuit you may have to provide your own trophies for the show. The circuit will always tell you what types of trophies you need, along with the quantity. You can take that list to a local trophy shop and get a good deal, maybe they’ll give you a discount for a free ad in the program! Remind them that you need the ensemble name plates separate since you obviously won’t know places until the contest is over. Arrange to pick up a week before the show if possible, don’t leave this one up to chance on timing.
Alright, it’s time for the big one: show set up at the school. For indoor events, you should try to get in the school the evening prior to set up everything without being in a major rush. Bring the circuit checklist if they provide one and keep a list of things that you think of as you go too. Each building will be different, but that’s why you have your maps! Label each classroom with the visiting ensemble name. Put up TONS of bright posterboards with arrows directing the flow of traffic around the inside of the building. Clearly, label warmup rooms A, B, and C. Outside you’ll do the same thing (this might need to wait until tomorrow). Big signage for the different parking areas, trucks, buses, spectators, and handicapped parking. More big bright posterboard arrows for spectators to follow to the gym or bleachers. Label the judges’ room and make sure they have some food from concessions available. Tape off the judges’ area in the bleachers and a spot for video. Tape the gym’s centerline for timing and flow. Test the PA and microphone for the announcer. Make double sure there is a power cable at the front and rear of the performance area! You’ll also need a table for ensemble check-in with a packet of info for each group (schedule, more maps, classroom assignments, etc). You’ll also want them to sign a form saying they’ll clean up their classroom before they leave. Then leave a ton of extra blank posterboards just in case you need more signage as the ensembles begin to arrive on show day.
Before the show starts you’ll want to walk the building or campus again to make sure nothing is wrong or out of place. Have a few volunteers walk with you at all times to use as gophers (go get me this, go hang this sign here). When the chief judge arrives you’ll work with him as he does his inspections of the performance arena and surrounding areas.
Did you remember that you still have an ensemble performing at the show today?! Hopefully, you’ve designated an assistant director to help with them as much as possible. Sadly, it’s probably more important that you work with the show setup and chief judge than with your ensemble for the day. If this is your 8th or 9th home show, you’re probably more comfortable with the boosters handling show setup. But, until you’re totally comfortable, stick with the show setup team, even if they tell you they can do it. Your name is on the program and you’ll be hearing about every little thing that went wrong. This has happened to me! Don’t let people tell you they can handle it. You handle it. Be certain of success, not just hopeful! However, when it’s your group’s time to actually perform, please do be with them for support, they look up to you as a leader, they still need that calm leadership before this performance too! When your performance is complete, hang out near the arena and make yourself available to ensembles that may be having technical issues or difficulty moving through the building. Be ready to help them all.
After the show is complete, you’ll want to help the chief judge prepare for critique. This is another area that should be clearly labeled on the map and in the building on big bright posters. You’ll need a waiting area and a critique area in a decent-sized room. Take some time and listen to the judges’ tapes for your group and prepare your questions for them. Now is the time to be with your staff and talk about the performance. Sit down, and take a load off while you wait. Most times you’ll be the last one to critique since most places take travel distance into account when deciding on critique order. Try to relax and eat something finally!
The last thing you’ll want to do before everyone leaves is to make sure the building has been cleaned up. During critique is a good time for your volunteers to start walking around and taking down signs, labels, and tape (once the bleachers have cleared out from the awards ceremony). Each classroom should be inspected by the boosters to ensure that nothing was left messy, damaged, or stolen. If you talk to other drumline or marching band directors while waiting for critique, ask them how their experience was, see if they think anything could be improved. You should still have your notepad on you, write down any ideas or improvements for next season! Make sure to thank everyone for coming to your show, and thank the boosters and volunteers for all their hard work today! Walk through the building once more, thank the custodial staff, and you can be the last one to leave for the day.
Let’s revisit the season since we should now be within our competitive portion toward the end. First of all, did you accomplish your goals so far? Have your rehearsal goals been achievable? If not, did you adjust your expectations accordingly and set more realistic goals each time? This should be true for the students as well as the staff, realistic goals will help build confidence on both sides of the equation! Not only that, but your ensemble will just be better because of it too.
As you progressed through the pre-competition season, did you make smart changes to the show or did things just fall into place due to good planning? If changes became clunky you’ll want to retain that information for this later part of the season, when you’re deciding if something is worth changing or not. Smart changes aren’t just based on content, they’re also based on the performer’s ability to adapt to them without sacrificing other elements of the show.
These smart changes will also be based on something called opportunity cost. If you’re taking time out of rehearsal to change something (then polishing it so it doesn’t look ‘changed’) you COULD be doing something else to clean a phrase or fix something else altogether. Rehearsal time is limited and the need for show changes might be outweighed by the need for reps to just smooth out the part. So, does it even need to change? Is changing something easier than just fixing it? Once more, decisions for you to make.
During the final few weeks, the pendulum shifts more toward cleaning and repetition. Changes aren’t as worthwhile as just polishing the material you already know. Remember the conversations you had with the judges early on, because this information has changed slightly. At your first competition the judges were not looking for clarity, they were looking for intent and big-picture considerations. Now, at championships, the judges are looking for clarity!
You should be utilizing the information gathered along the way, but remember to focus in as your move forward in time. While you may have fixed something important for the big picture to work correctly in the show, the hands of time move ever forward! Judges may note improvements as they see them, but each week you’ll be put under a more powerful microscope until each little thing may catch the judges’ attention by championships. Don’t let this scare you though, you’ll also get more and more credit for things you’re doing well each week too!
By championships, you should have a totally polished show, and all the patchwork you made along the way should be smoothed out completely, with no rough spots! Keep this in mind as you decide to make changes later in the season, if it’s worth polishing, keep it, but if something ain’t working it needs to change!
Hopefully, this checklist can help you fine-tune your marching band or drumline season! There are obviously way more nuances than what’s covered here, but for a big-picture, this list can help keep you on track. You’re probably not going to print this out and hold onto it at every practice, but if you take a few notes as you read they might come in handy, or help you remember something important along the way. The most important thing of all though is to learn from this current season and bring that information into the next one! You aren’t just getting new members each season, you’re also getting a new perspective. Don’t lose sight of that, experience is your most valuable asset!
Back to the percussion articles.
Most drummers will find a good assortment of cool drumset accessories simply by browsing online or watching drum videos, but some drumset accessories fly under the radar! This is a list of some of the best drumset accessories drummers can buy which is made up of some clever solutions to interesting problems, and can also help you become more creative in your playing! Let’s trim the fat and get right down to business!
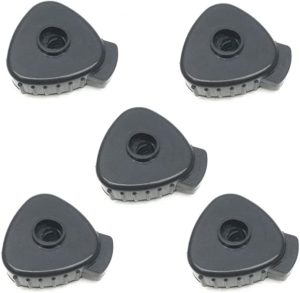
These quick-release cymbal nuts will help you load-in and load-out faster at gigs and shows. These clips slide over the cymbal rod threads and lock your cymbal to the stand with the release of the button. Then, to remove, simply press the button and pull the nut off! These work with all types of cymbals with the exception of hi-hats, so put a few packs on your birthday list or buy some as stocking stuffers. Parents, if you want to get these as a surprise just simply look at the drumset and count the cymbals, you’ll need one for each cymbal, it’s that easy! These are nearly universally compatible and you can’t go wrong with them. No more screwing and unscrewing every single cymbal at live shows, you won’t be the last one ready to go on the stage anymore! Currently, on Amazon these are only $2.60ea (sold as a pack of five), so get some extras and you’ll be able to expand your kit in the future! Check out the quick-release cymbal nut drumset accessories on my studio kit below:
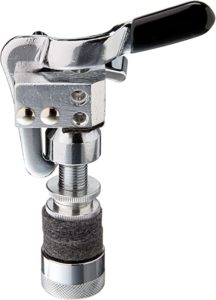
This hihat drop clutch should be a requirement on all drum sets and is on of the most common dumset accessories, also the most simple! This simple and cheap device turns your standard hihat into a drummy-hat and standard-hat combo! Especially if you’ve upgraded to a double bass drum pedal, then you just simply need this drop clutch on your hihats. The drop clutch allows you to take your foot off of the hihat pedal and still be able to play on closed hihat cymbals. This frees up both feet to use your double bass drum pedals. The drop clutch works by replacing your standard hihat clutch which screws onto your top hihat cymbal. The drop lever bolts onto your hihat stand’s rod and when you press the lever gravity drops the top cymbal down onto the bottom cymbal. To undo this simply press the hihat pedal down and the lever decends and grabs the cymbal clutch to lift it back up with the rod. This is a very clever device and will help elevate your playing! If you want to take this to the next level consider using this drop clutch with the next accessory on our list, the remote cable hihat stand! Check out the drop clutch on my studio kit below:

This remote hat pedal, or sometimes called a cable hat pedal, is useful for both your main hihat cymbals or as an auxiliary or secondary hihat cymbal set. The cable on this device allows you to mount the hihats wherever you want on the drumset, they no longer have to be put directly over the pedal itself like on standard hihat stands. Better yet, you can even put the hihat cymbals on the completely opposite side of the drumset if you choose! Another nice feature is that you can now angle your hihat cymbals which was not a possibility with a standard hihat stand. The cable hat pedal also allows you to adjust tension on the cable (which works the same as a bicycle break line) and you can fine tune the tension to your specific preferences. The pedal itself can now also be placed wherever you choose and does not have to be put in the typical spot on the floor. Since this pedal is slim you even have the option of placing this hihat pedal inside the double bass pedal as opposed to outside. Enjoy your hihat freedom with this great accessory!
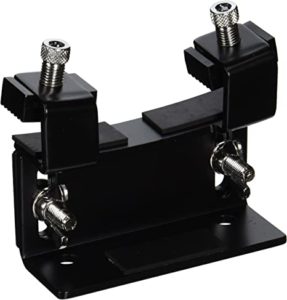
Note: You’ll also need an arm mount to attach the top of this cymbal to your drumset mounting frame or cymbal stand. Make sure you have enough room for the cymbal radius when choosing a mounting arm. Check out the remote hat pedal on my studio kit below:
This bass drum riser has two possible functions making it one of the most versatile drumset accessories on this list, one is an intended function and one is a bit more clever. If you have a smaller bass drum, let’s say about 20 inches, you’ll probably see that your bass drum beaders tend to be a little too tall to hit the drum in the center of the batter head. This riser attaches to the bottom of the bass drum’s batter rim and lets you raise the drum with two wingnuts to a height that puts the beaders in the center of the drum. The bass drum pedal now clips into the base of this metal riser for a secure connection. This is a nice accessory for smaller drum kits, but let’s be honest, most people have a 22 inch bass drum and don’t have any issue with their bass drum beaders. So lets discuss the clever use for this accessory, and it’s a bit in-depth.
Most drum set bass drums have mounts for the rack toms that hover over top of the bass drum. The tom mount holes also tend to be on the far side of the bass drum shell, rather than the side toward the drummer. These two toms tend to usually be 10 inches and 12 inches, meaning they are usually pretty tall as well. If you’ve ever seen a newer drummer set up their kit you’ll tend to see the two rack toms angled very steep since they have to be up high enough to not hit the bass drum. Angling the rack toms prevents the drummer from hitting the batter heads with a perpendicular stroke, and rather using a glancing blow which diminishes the sound quality. Here’s a solution that utilizes this bass drum riser and might make this easier! Start by swapping the two bass drum heads, you’ll want the batter head to be the one that’s on the side with the tom mounting holes. This means that the rack toms, when mounted, can be hanging over the batter rim of the bass drum which means they can be lower and flatter! However, this also means the the bass drum spurs are on the opposite side. That’s where this bass drum riser accessory comes in to play. Don’t put it on the batter rim this time, instead, put it on the bottom of the bass drum’s resonant head rim. All of the bass drums weight will be resting on this riser now. The spurs can still be utilized normally, so position them as needed (making sure to attach your bass drum pedal so that the drum is lifted to its final height off the rug. This has the secondary benefit of giving the spurs a more extreme angle which will do a better job of preventing the drum from sliding forward when played! Check out this solution on my studio kit below!
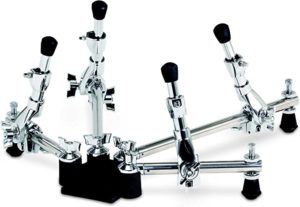
This handy bass drum riser and stand is super useful for smaller bass drums! If you’ve ever converted a floor tom into a bass drum this might also be a great solution for you! This stand is so incredibly customizable that you can fit almost any drum on it for use with a bass drum pedal. The pedal clips into the black mounting bracket and every arm on this device can move to accommodate your drum or accessory. If you have a small bass drum, as stated above, this will also help you place the drum beader in the center of the head, but unlike the solution above, this accessory can accommodate even the smallest of drums! The rubber stoppers on the floor also have metal spikes hidden within, so you can use this stand on carpet or hardwood floors without fear of the drum sliding away from you. I’ve found that putting a weight inside the shell of the drum also prevents it from sliding around on top of the mount, no matter how hard you play! This super stand is totally worth every penny, and once it’s set up initially you can move it in and out of the show site quickly! Check out the bass drum riser under the small bass drum on my custom travel kit in this gallery!
Use the contact page if you want to request some more useful drumset accessories, or if you have more questions about these five drumset accessories above!
Here’s the long-awaited second installment of the Steering Wheel Rhythms posts, and it’s actually a two-for-one special with Gods Of Rapture by Meshuggah! There are two sections of this song we’re going to break down the rhythms for: The syncopated section of the intro and then the repeated rhythm under the guitar solo as a bonus.
Note from our legal department: PatrickRFBlakley.com and its authors shall not be held responsible or liable for any loss, injury, or damages resulting from the use of these materials. Steering Wheel Rhythms, and all other musical notation available on this website, should not be used while driving or operating a motor vehicle of any kind. Performance of these articles is at your own risk.
An interesting thing that Meshuggah does with the above syncopation is that it repeats an uneven phrase while maintaining a 4/4 meter. This could be written in like 15/8 (or probably more appropriately 4/4+7/8), but it was obviously intended to stay in common time because it ends perfectly aligned with the overall 4/4 meter. This creates a very fun ostinato that repeats over the barline in a creative way! This is very much like a long displacement as well, it just keeps pushing forward to realign instead of reverting back! You’ll also notice the sticking is the ‘default’ natural sticking too, so drummers that are learning how natural sticking works can use this as a great example as well. Now, let’s check out the breakdown section with another repeated phrase, but this time it utilizes a lot more negative space!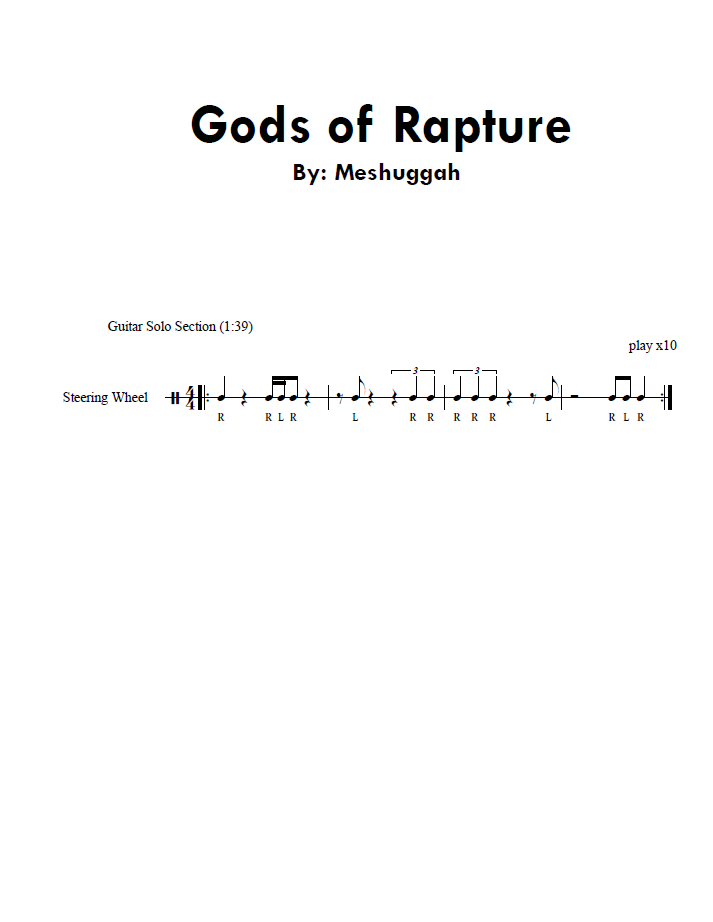
This breakdown section is also done in an interesting way by using lots of rests between sporadic groupings of notes that add intensity as the breakdown progresses. We also have metric modulation occurring over the barline from measure two to three. This uneasy rhythm is enhanced by the rest on beat three to begin the triple-feel and the triple-feel also lacks a downbeat on the next beat three resulting in more unease to the listener. Even more still, the triple-feel is surrounded by more space on either side which creates even more tension. Not to mention an unnatural group of five notes adding to the effect. This rhythm choice is similar to using a diminished seventh chord for any music theory people, it creates unease and is done in a very effective way in this example! The best part about this phrase is that it repeats so many times under the intensifying vocals and guitar solo section on top of it. This pattern drives the music and demands the listener to stay grounded while the music escalates around it. Hopefully these examples are fun to play while jamming with the music, but they also be great tools for rhythm learning and counting! So have fun!
The Easy Speed of Sound Delay Calculator for Marching Band and Drum Corps has been described in a previous article, but we both know that it’s a tricky concept to explain in pure text form. Recently I’ve been working with my friend Pat McNeil to design an online field graph to help visually interpret the equivalent sound delay on a football field. First though, a huge thanks to Pat for his help with coding this, please check out his site at PatMcNeil.net to get in touch or check out his content.
.
Speed of Sound Delay Calculation Review:
To quickly review this small portion of the Cost of Timing concept, we start with a musician on any given part of the football field (let’s use a snare drummer for example). This performer plays a single note on the drum and it takes a specific amount of time, at the speed of sound, to reach the listener (in reality this only needs to the the furthest musician forward that the snare drum’s sound needs to reach, so we base it on the front of the field which is where the pit usually stands). What we want to see with this graph is where else on the field it takes the exact same amount of time for that sound to reach the front center of the field. For marching band purposes we use our step size as the distance, 22.5″ per step, so on the field graph below you’ll see both axes using steps as the distance (the field lines are displayed for every 10 yards for reference, but the labels are all steps).
.

.
Entering Data:
When inputting data you’ll need to use the total number of steps behind the front sideline, this means that if you’re behind the back hashmark you’ll still need to find the total number of steps in reference to the front sideline rather than the back hashmark. The same is true side to side by using the 50 yard line, so even if you’re just two steps away from the 20 yard line you’ll still need to use the total number of steps away from the 50 yard line for your input.
.
Reading the graph:
When you see the graph you’ll notice the red arc through the position on the field that you input originally. The red arc is showing you where else on the field the sound delay matches yours. If you scroll your mouse over the red arc (or tap your finger on your mobile device) you’ll see the number of steps to any position you choose in the top right (distance back first, then sideways distance second, in steps). Keep in mind the white lines on the football field graph are just the 50, 40, 30, 20, and 10 yard lines, for clarity sake we’ve skipped the 45, 35, 25, 15, and 5 yard lines. For reference on this graph there would be 16 steps between marked white lines. Also note, high school hash marks are dashed while college hash marks are solid lines.
.
Get started:
Introducing “Steering Wheel Rhythms” to the PatrickRFBlakley.com percussion articles! Steering wheel rhythms are going to become a regular installment with sheet music representing certain parts of various songs. Usually, the songs will involve quite intricate rhythms or phrases and they’ll also tend to be from songs that make us want to pound them out on our steering wheels!
Note from our legal department: PatrickRFBlakley.com and its authors shall not be held responsible or liable for any loss, injury, or damages resulting from the use of these materials. Steering Wheel Rhythms, and all other musical notation available on this website, should not be used while driving or operating a motor vehicle of any kind. Performance of these articles is at your own risk.
Now let’s check out the fun with the Animals As Leaders song The Woven Web!
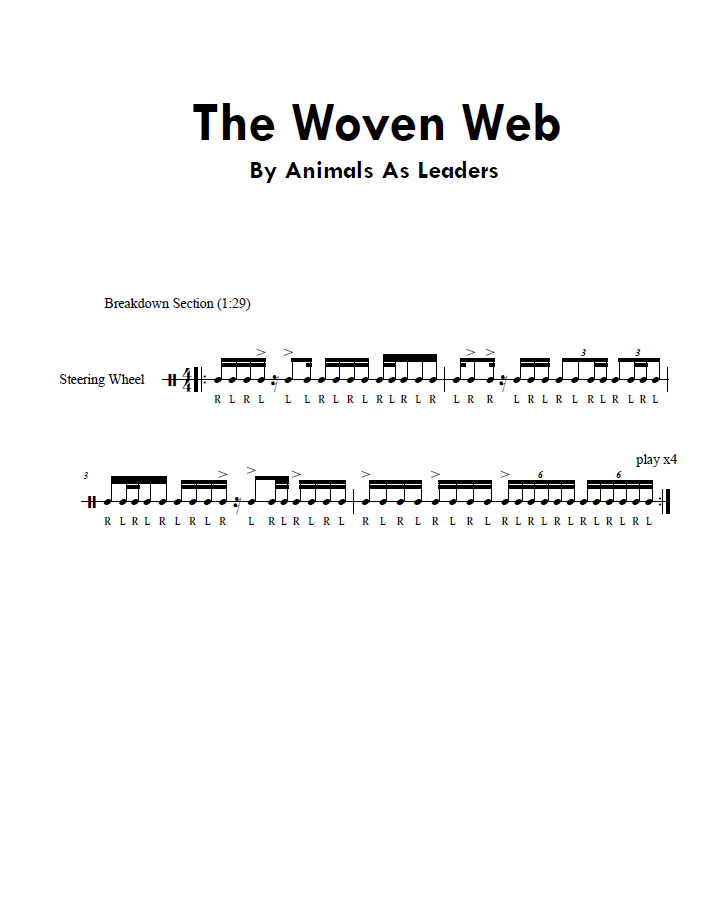
Some interesting things to note on this rhythm overall is the use of sixteenth-note rests and thirty-second notes interspersed within the rhythm. There are a few obvious sixteenth-note rests written in the phrase, but keep in mind there are a few more hiding after the three eighth-notes as well. This creates nice gaps that break up the rhythm and further exaggerate the overall feel of the breakdown, especially when factoring in the guitar pitch choice using those eighth-notes. The other side of the equation is the thirty-second notes (sometimes called hertas). We see three actual pairs of these fast notes, but we need to also look at the triplet modulation using sixteenth-note triplets to have a similar effect. The coolest part of the fast herta groupings is that the two found within the triplets move directly into one in the sixteenth-notes. This is a great use of metric modulation and creates a nice variety while also pushing forward with the rhythm. Speaking of duple to triple feels, you might also notice that the first two measures and last two measures are built exactly the same: Six counts of duple feel followed by two counts of triple feel. With the crazy rhythm changing within the phrase it’s very interesting that the framework stays the same both times!
If you have any suggestions for an upcoming Steering Wheel Rhythms post please let me know in the contact page!
Terre Hill, Woodard, New York State: Surrounding History & Exploration
An essay by Patrick R. F. Blakley
Ok, it’s been a while since I posted anything here, but it’s with good reason! I’ve recently just completed a 17,500+ word research paper focused on the Terre Hill area of Woodard, NY inside the town of Clay. This is not at all drum related, though I did sneak in a marching band fact with historical relevance. I don’t blame you if you just scroll past this one, but if you’re in the area you might feel a little compelled to check it out! I’ve also included a family tree as well as some family ties to Terre Hill. Primarily family names that were focused on such as Blakley, Postle, and Relyea, with ties to the family names of Teska, and Weller. If any of this interests you please check out some of the following links with much more information:

Download the full paper here:
https://patrickrfblakley.com/pdf/TerreHill.pdf
Buy a printed copy here:
https://www.lulu.com/en/us/shop/patrick-r-f-blakley/terre-hill-woodard-new-york-state/paperback/product-vqp2d6.html
Also available on Amazon.com:
https://www.amazon.com/Terre-Hill-Woodard-York-State
Check out the related maps and some research material:
https://patrickrfblakley.com/terrehill
Blakley Family Tree Info:
https://www.ancestry.com/family-tree/tree/78268943?cfpid=36386609705&dtid=100
Related geocache with good descriptive info:
https://www.geocaching.com/geocache/GC5C2YW_terre-hill-cache
Be sure to check out some interesting references in the bibliography as well, dive in a little deeper!
Now back to your regularly scheduled programming…
.