Buy Unique Drumline Apparel and T-shirts for Marching Band and Indoor!
Recently there has been some demand for drumline apparel and custom t-shirts for marching percussion. I’ve decided to push this into several specific areas of marching percussion and drumming in general. There are even some colorguard and winterguard apparel as well! (I know how much winterguards like to keep it in the toaster.) If you don’t find what you like please feel free to contact me and let me know what you would like to see in the shop, whether it’s a design idea or just different clothing options for a current design. This selection of drumline apparel is not going to be found anywhere else online because it’s straight off the top of my head! These are all clothes that I think would be funny to see at a marching band rehearsal, so they do include some things that nobody else would understand. I think that’s awesome!
.
.
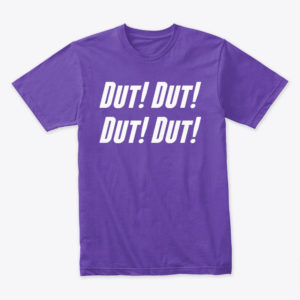
The best way to stay in time is to subdivide!
You know that, but why not let everyone else you meet know that too by wearing this in-your-face dutting tshirt everywhere you go!
Check out the apparel and merch section for tons of great drum shirts and accessories to wear to your next rehearsal. From things that the whole band will understand, to things that only the drummers will understand, and even things that nobody might understand!
Get your subdividing shirt right now!
.
.
Drumr: The Best Drum Practice App for Drumline and Drumset Players

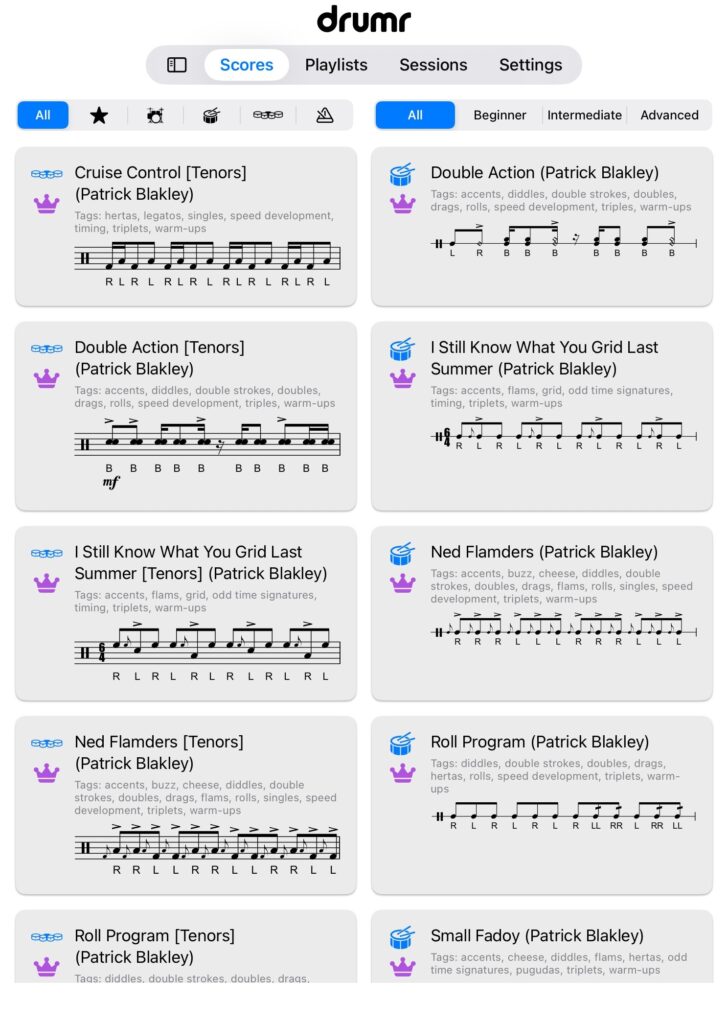
If you’re serious about drumming, you know practice isn’t just about putting in hours. It’s about putting in the right hours. That’s exactly where Drumr, one of the best drum practice apps available today, comes in. I’m excited to officially join as a contributor to the app, and I can tell you firsthand, this isn’t just another practice tool.
Drumr is built for drummers at every level, from the kid picking up sticks for the first time to the seasoned pro sharpening their timing. With grids, progress tracking, e-drum analysis, and a huge library of grooves, fills, and exercises, it’s designed to make every rep count.
My Contributions to Drumr
As of the latest update (Version 5.11), I’m thrilled to have 30 new marching snare warmups and marching tenor exercises added to the app. These include titles like Accentual Healing, Cruise Control, I Still Know What You Grid Last Summer, Ned Flamders, Small Fadoy, Roll Program, Triplet Diddle Patterns, and plenty more.
I’ve also created drumset grooves and fills that are a lot of fun to play while reinforcing rudimental drumming on the drum kit. The idea is to bridge marching percussion skills with drumset applications so you grow as a well-rounded player.
Why Drumr Stands Out
-
Authentic Scores & Sounds – Every groove, fill, and exercise comes with clear, accurate notation and high-quality drum sounds. Whether you’re reading drumline grids or drumset charts, it feels like you’re playing on a real kit or marching in a corps. You’ll actually hear what you’re supposed to play, which makes learning and practicing way more effective.
-
Serious Tools for Serious Chops – Drumr isn’t just a collection of exercises. You can loop tricky sections, ramp tempos up or down, skip measures, and repeat exactly what you need to master. These pro-level features help you build speed, control, and precision faster than practicing blindly.
-
Beginner-Friendly Courses – New to drumming or just picking up a new style? Drumr’s guided video lessons walk you step by step through exercises and routines. They’re designed to help you develop real skills, not just memorize patterns, so you can start strong and see real improvement from day one.
-
Progress You Can See – Tracking your improvement is part of the fun. Drumr has charts, streaks, and activity rings that visualize your progress over time. Watching your stats improve keeps you motivated and helps you plan what to practice next.
-
Smart Suggestions – Drumr remembers what you worked on last and recommends what to tackle next. It’s like having a coach in your pocket guiding you through the right exercises, so every practice session builds on the last instead of being random.
Drumline and Drumset in One Place
Most apps cater to either drumset or marching percussion, not both. Drumr breaks that mold. Drum kit players can dig into grooves, fills, and songs across genres like rock, funk, jazz, Latin, and metal. Meanwhile, drumline players get grids, hybrid rudiments, and corps-style warmups inspired by some of the best in the activity, including Scott Johnson and Kevin Murray.
If you teach, Drumr even lets you create private scores and warmups for your students or drumline, making it one of the most versatile tools for instructors.
The Game-Changer: E-Drum Analysis
One feature that truly sets Drumr apart as the best drum practice app for electronic drums is its performance analysis. Plug in your e-kit via USB or MIDI, and the app will track your timing accuracy in real time. You’ll instantly see if you’re early, late, or missing notes, giving you feedback that used to require a teacher sitting next to you.
Thanks to the Developers
A big shoutout to Scott Gardner and Geoff Fry for their hard work in adding my content to Drumr. They’ve created a platform that’s not only powerful but also inspiring for drummers everywhere.
Why I’m On Board
As someone who’s spent decades in percussion, performing, teaching, and writing, I know what’s helpful in the practice room and what isn’t. Drumr gets it. Whether you’re drilling marching snare warmups, polishing drumline exercises, or working through creative drumset grooves and fills, this app helps you practice smarter.

![]()
Drumr: Learn Faster. Drum Better.
The reps are on you. The tools are here.
Download Drumr and start leveling up today.
If you’re looking for even more ways to level up your drumming, check out my full library of marching snare, tenor, bass drum, and pit exercises, drumset grooves, and full warmups. There’s something for every skill level, whether you’re sharpening rudiments, exploring new grooves, or just warming up before a rehearsal. Download the sheet music for free, then let the Drumr app put you through your paces! Your chops will thank you.
The Kickflip Bass Drum Setup: A Smarter Way to Position Your Kit
Most drummers set up their bass drum the way the factory intended: batter side toward the player, resonant head facing out, toms mounted directly on top. It’s standard. It works. But it also forces toms to sit higher and at steeper angles than what’s ideal for technique.
That’s where the Kickflip Bass Drum Setup comes in.
What Is the Kickflip Setup?
The Kickflip Setup is a bass drum configuration that flips tradition on its head, literally. Instead of using the bass drum in its stock orientation, the batter and resonant sides are swapped. The spurs are now on the drummer’s side of the bass drum, and a small riser is placed under the front of the drum. This stabilizes the bass drum while lifting it slightly off the ground.
With the drum flipped, the tom mount shifts closer to the player. This allows rack toms to sit lower and flatter, hanging naturally over the edge of the bass drum instead of towering above it. The result is a more ergonomic playing position that favors relaxed, efficient technique.
Why It Works
-
Better Tom Placement
Lower, flatter toms make it easier to strike with proper stick angles. You don’t have to reach or over-rotate your wrists, which reduces strain and improves accuracy. No more crazy tom angles that bounce the stick back in unnatural directions! -
Improved Stability
The bass drum now has four contact points with the floor: the two spurs angled forward, the bass pedal, and the riser. This locks the drum in place while taking some weight off the bass drum pedal itself, which means the drum is less likely to slide forward when played (coupled with the four points of contact). The bass drum angle is also now more customizable since the riser at the front and the spurs can work together to hold the weight more securely with whatever angle you prefer (improving sound quality as well, because now you can point the drum exactly at the desired angle!). -
Cleaner Look
Since the resonant head is now facing the drummer, the drum’s logo ends up on top and uncovered. It’s a small detail, but it makes the kit look sharp from the audience’s perspective. It’s almost like this was meant to be! -
Fresh Feel
Raising the front of the bass drum even slightly can change its response. The angle of the drum is now more customizable, and therefore the bass drum beater’s angle of attack can be set more accurately. This also pushes the bass drum a light further from the players body which means the leg isn’t uncomfortably cramped behind the bass drum, and you now have the freedom to place the snare and hihat where they feel the best, instead of shoving them in a tighter space.
Who Should Try It?
-
Drummers chasing ergonomics: If your toms always feel too high or angled, this solves the problem. Especially drummers who own very tall rack toms!
-
Players with smaller builds: A more compact setup keeps everything within reach.
-
Technique-focused students: Teaching with this setup encourages better wrist paths and cleaner motion.
-
Creative tinkerers: If you’re the type to experiment with gear, this is an easy mod that requires no permanent changes to your drum.
How to Set It Up
-
Remove both bass drum heads and hoops.
-
Swap them: put your batter head on the resonant side and your resonant head on the batter side (switch the hoops too, your bass pedal should still mount on the padded hoop if you have one).
-
Rotate the spurs so they now extend toward you. Some spurs will still allow you to point the tips forward which is even better! Worst-case scenario, you can remove both spurs and swap which side they’re on, but this may mean you can’t collapse them alongside the shell for a kit that travels. Play around with the spurs for your best options!
-
Place a riser under the new front of the bass drum to keep it stable and slightly elevated. Adjust the riser to your desired height.
-
Mount your toms from the repositioned holder, they’ll sit lower and flatter, right where you want them.
-
Test angles, fine-tune spur position and riser height, and lock everything down. Make sure to do this step with the bass drum pedal attached so the angles don’t change when you eventually attach it.
Final Thoughts
The Kickflip Bass Drum Setup is about breaking free from convention to serve your technique. By flipping the drum and supporting it with a riser, you gain better ergonomics, improved stability, and a cleaner stage look. It’s simple, it’s reversible, and it might just make your kit feel brand new.
Drumming is about finding what works for you. For me, the Kickflip Setup is the most natural, comfortable way to play, and once you try it, you might never go back.
Drumming Gateways: Thresholds Every Drummer Must Pass Through
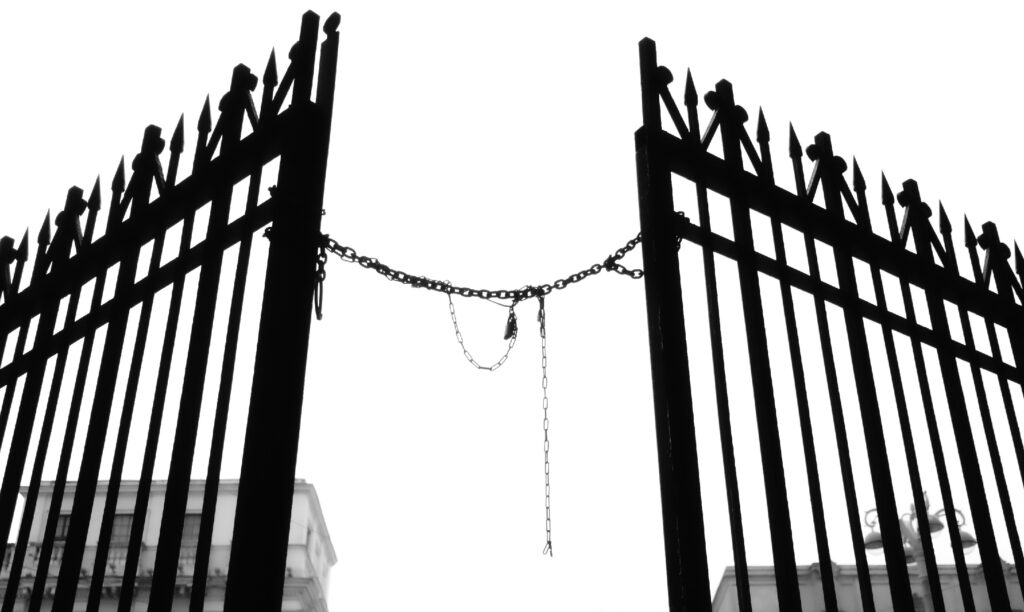
Learning drums isn’t a straight road. It’s a winding path full of gateways, moments where a new skill feels like a solid wall until you push hard enough to pass through, and every time a larger drumming landscape opens up. Every drummer, whether a weekend hobbyist or a world-class performer, has to face these checkpoints. The difference between giving up and leveling up is in how you approach each one!
Here are some of the most common drumming gateways and why they matter.
1. Getting Coordinated with Quarter Note
and Eighth Note Grooves + Basic Fills
This is the very first gate, and it feels enormous when you’re starting out. Getting your limbs to cooperate on a simple groove with the bass drum, snare, and hihat is like trying to pat your head and rub your stomach while riding a bike. Then throw in a fill without causing a pile-up? That’s where the real test begins. But once this clicks, the door to music actually sounds open, and drumming starts to feel a bit like music instead of noise.
2. Solidifying Good Consistent Technique
Good hands are the currency of drumming. Without clean strokes, rebound control, and a relaxed grip, everything else gets stiff. This gateway is less about flash and more about discipline, and many drummers may not give it the attention it deserves. Practicing slowly, ironing out bad habits, and learning to play with control will set up efficiencies for the rest of your drumming life! Push through this one and suddenly your grooves feel comfortable at faster tempos, your quality of sound cleans up considerably, and your playing becomes trustworthy.
3. Paradiddle Rudiments
Paradiddles are the first “what the heck is this for?” rudiment. Many people up to this point think drumming is just alternating hands as fast as you can! At first, these types of rudiments feel clunky, but they unlock more coordination, hand independence, and fluid movement around the kit. You don’t realize it until later, but paradiddles are the skeleton key for creative sticking patterns, fills, and orchestrations. You’ll begin to see these paradiddle stickings everywhere you look! Getting past the paradiddle threshold and into more rudiments is like being given a new musical alphabet to write music with.
4. Sorting out Sixteenth Note Rhythm Groupings
This is a minor gateway, but every drummer eventually runs into this sixteenth-note puzzle. At first, it feels simple, just four notes per beat, but then the groupings sneak in: 1e&_, 1e_a, 1_&a, _e&a. Suddenly, you’re second-guessing whether your hands or your brain are in charge. This gateway is all about internalizing the feel of these rhythms until you can place notes anywhere within the beat without losing time. Mastering this challenge doesn’t just improve your fills and grooves, it builds the rhythmic foundation you’ll need for funk, hip hop, marching percussion, and just about every advanced style of drumming. Check out my handy guide for breaking down these rhythms at a glance!
5. Downstrokes
This one sneaks up on you. You think drumming is just about hitting stuff, but then you realize you also need to control the stick after the hit. Unlike the other three basic drum strokes (the free stroke, tap, and upstroke), the downstroke requires a controlled amount of grip pressure to keep the stick low, making it the key stroke for dynamics, accents, and musical phrasing. The downstroke is the master switch for dynamics, accents, and phrasing. Without it, everything sounds the same volume, like a robot hammering on tin. With it, your playing breathes. It’s the gateway from drumming like a beginner to sounding like a musician.
6. Putting Bass Drum and Snare Drum Notes
Between Hihat Notes
This is where coordination gets spicy, but in return you get some really hot grooves! Placing kicks or ghost notes in between the eighth note hihats demands true limb independence. At first, it feels clunky and unnatural, but once you unlock it, your grooves go from basic to professional-sounding. Every style of playing lives on the other side of this gateway. As a fun note, there are a total of 256 possible eighth note bass drum note measure variations (in common time). When you pass through this gateway, you open yourself up to playing more than 65,000! Here are the most common ones, you know, just for the fun of it!
7. Using Back Fingers for Speed
Speed isn’t about slamming harder or higher energy, it’s about efficiency. The back fingers act like turbo boosters, harnessing the stick’s natural rebound. The first time you get this working, doubles suddenly fly, and you realize speed was never about muscle, it was about touch. This gateway turns hours of struggling into effortless fluidity. The best part about this gateway is that if you have already focused on good technique on gateway number 2, so your fingers are already prepped for being utilized for speed! Brace yourself if you skipped the technique step and have to relearn to drum with more efficient technique here!
8. Open Rolls
The open roll is where you prove you can control doubles, not just fake them. It takes patience to make them even, smooth, and controlled at different tempos. Once you own it, the open roll becomes a versatile piece of vocabulary that pairs well with other rudiments like paradiddle-diddles and more. Without open rolls, your drumming vocabulary stays bland. I mean come on, the first thing anyone asks a drummer is to play a drum roll!
9. Using the Left Foot Confidently on Hihat
The left foot is the most ignored limb in drumming. But once you train it, you gain a fourth voice. That’s a game-changer. Adding hihat barks, splashes, or keeping time while your hands go rogue turns your drumming from 3D to 4D! Crossing this gateway is when you stop just playing grooves and start building textures.
10. Flam Rudiments
Flams feel awkward until they don’t. Then suddenly, your playing gets bigger, your accents pop, and your fills explode with character. This is the gateway to sounding orchestral on the drum set. Flams are also the DNA of most hybrid rudiments, so this checkpoint prepares you for the crazy stuff to come!
11. Playing Five or More Layers with Only Four Limbs
At some point, every drummer discovers the cruel math of drumming: you only have four limbs, but that doesn’t mean you can’t play more than four layers! This gateway isn’t about suddenly growing a fifth arm, it’s about learning how to imply multiple layers through orchestration, dynamics, and creativity. Passing this challenge teaches you how to emphasize the most important voices in the groove while still creating the illusion of extra depth. It’s where drummers stop thinking like timekeepers and start thinking like artists.
12. Foot Double-strokes
This is the threshold where your footwork starts to rival your hands in independence and control. True foot double-strokes are not just two taps in a row, they’re consistent, even, and able to integrate seamlessly with hand patterns. Mastery here opens doors to complex ostinatos, hybrid grooves, and full-limb coordination that makes everything else feel like child’s play. Once you can drop solid foot doubles into any rhythm without thinking, your creative options explode.
13. Cheeses, Flam Drags, and Flam Fives
These are the “welcome to the big leagues” hybrids. At first they feel impossible, but they build finesse, finger control, and endurance in ways nothing else has done yet. They also sound incredible when you can pull them off clean. Drummers who clear this gateway aren’t just playing rudiments, they’re speaking an advanced language.
14. Advanced Hybrid Rudiments
This is the mountaintop of hand development. Once you can break down and master true hybrids, combinations of flams, diddles, taps, and accents, you’re in the territory where creativity and technicality merge. Hybrid rudiments force your hands to solve puzzles at high speed, demanding precision, touch, and endurance all at once. But the reward is huge: hybrids open the door to an almost endless vocabulary on the drums.
15. Playing Something Nobody Has Ever Played Before!
Every phenomenal drummer eventually starts doing things that have never been done before. Maybe it’s a new sticking under a unique pattern that comes naturally to only you, a wild orchestration with several layers, or a hybrid groove that sounds completely original split across the hihat and ride. This gateway is less about speed or coordination and more about creativity and artistry. The challenge here is turning what comes naturally to you into innovation, using everything you’ve learned to push drumming into new territory. Clearing this gateway is what separates the players who just copy from the players who truly create.
Final Beat
Every drummer’s journey passes through a series of these gateways. Some people find a stuck gate and just stop, while others push harder and harder until it budges open. The truth is, these barriers aren’t meant to keep you out, they’re meant to test how much you want in. Each time you push through, the view gets better, the music gets deeper, and you get closer to the drummer you want to become.
Next, see how these gateways line up with the standard drumming levels and beyond!
The Circle of Drumming Mastery
Using the clockface to define what you hear: From messy to mastery!
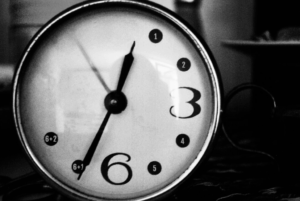
Keeping time might have a new meaning!
The Circle of Drumming
-
At 12:00, we begin: someone who has never touched a drumstick. No experience, no technique, just curiosity.
-
As they move clockwise to around 1:00, they start playing, but it’s still chaotic. Maybe they’ve picked up a pair of sticks and are just hitting things. It sounds random, because it is. There’s no control or context, just exploration.
-
As they progress downward, through 2:00 to 3:00, something happens: structure forms. They learn rudiments, timing, and groove.
-
At about 6:00, they’ve arrived at what most people would call a “good drummer,” or a “very good drummer” even! They can hold down a solid pocket, improvise tastefully, and maybe even adapt across a few different genres. Drummers and non-drummers alike recognize their skill.
From Mastery to Artistry
Back at the Top: Noise or Nirvana?
Why This Matters
Hour, Minute, and Second Hands
Putting it All Together
As you can see, the top half of the clock on either side is abstract, while the bottom half is more concrete. The lower hours are where drummers communicate clear, tangible skills: technique, rhythm, timing, coordination. You can see the brushstrokes here. It’s like watching a realist painter, every detail has a purpose, and every element is easy to identify.
The top half of the clockface, drummers are communicating emotion, texture, even ambiguity (whether on purpose or not; depending on the side of the clock). Think of someone that is just starting drums, the way they hit the drum is pure emotion, with no purpose other than to communicate expressively. On the other side, we see the same thing, but this time it’s intentional. And just like in visual art, what may look (or sound) simple to a casual observer is often hiding years of mastery underneath.
So let’s break it down even further. Here’s how the clockface of drumming parallels the evolution of artistic expression, and why mastering the top of the circle might just be the hardest part.
12:00 — Naïve Art / Childlike Expression
-
The Blank Canvas
-
Art Style: Naïve Art, Cave Paintings, Children’s Drawings
-
Drumming Parallel: Random hits, pure curiosity, no awareness of form.
-
Mindset: “What happens if I hit this?”
-
Intent: None yet—it’s about discovery.
1:00–2:00 — Folk Art / Outsider Art
-
The Dabbler
-
Art Style: Folk Art, Art Brut (Raw Art)
-
Drumming Parallel: Untrained but expressive. Instinctual grooves, maybe out-of-time, but emotionally honest.
-
Intent: Emerging, but technique hasn’t caught up.
3:00–5:00 — Realism / Academic Art
-
The Sketcher / Builder
-
Art Style: Academic Realism, Classical Painting
-
Drumming Parallel: Rudiments, metronome work, clean execution. Mastering tools.
-
Mindset: “How do I do this right?”
-
Intent: Technical correctness, structure, clarity.
6:00 — Renaissance / Golden Age
-
The Composer / Architect
-
Art Style: Renaissance, Baroque, Neoclassicism
-
Drumming Parallel: Mastery. Groove, touch, musicality. You know when not to play.
-
Mindset: “Serve the art. Make it timeless.”
-
Intent: Music before ego. Craft with clarity, expression, and taste.
-
Examples: Leonardo, Caravaggio, Velázquez → Steve Gadd, Nate Smith, Carter McLean
7:00–8:00 — Impressionism / Cubism / Modernism
-
The Innovator / Re-imaginer
-
Art Style: Impressionism, Cubism, Modernist Abstraction
-
Drumming Parallel: Playing with over-the-barline subdivisions, metric modulation, implied time, displacements. Still rooted, but pushing form.
-
Mindset: “What if we see time differently?”
-
Intent: Stretching the medium. Deep control, fresh interpretation.
-
Painters: Picasso, Monet, Cézanne → drummers like Mark Guiliana, Brian Blade, Eric Harland
9:00 — Abstract Expressionism / Dada
-
The Edgewalker
-
Art Style: Pollock, de Kooning, Dada, Surrealism
-
Drumming Parallel: Controlled chaos. Intentional randomness. Asymmetrical phrasing. Might abandon pulse entirely.
-
Mindset: “The form is the message.”
-
Intent: Deep experimentation. Borderline alienating or electrifying.
10:00–11:00 — Conceptual Art / Minimalism / Fluxus
-
The Disruptor
-
Art Style: Wassily Kandinsky, Duchamp, Fluxus, John Cage, Mark Rothko, Cy Twombly, Agnes Martin
-
Drumming Parallel: Performances that deconstruct what drumming even is. Silence, found sounds, theater. Rhythmic philosophy.
-
Mindset: “Why is this a drum solo?”
-
Intent: Challenge the idea of music itself.
12:00 (again) — Zen Calligraphy / Art as Being
-
The Mirror
-
Art Style: Zen Ink Painting, Performance Art, Mysticism
-
Drumming Parallel: Drumming as presence. Every hit is meditation. Could be noise or nothing. It’s the awareness that matters.
-
Mindset: “I am the drum.”
-
Intent: You’ve let go. You’re not trying to be good, you just exist as the sound of a drum.
Where you are on the clock doesn’t matter as much as the fact that you’re moving. The circle isn’t just about skill, it’s about awareness. Simple might be hard. Wild might be wise. Keep listening, keep growing, and use the clock as a reference along the way.
This article goes hand-in-hand with the article of Drumming Levels Explained: The Standard 6 You Know, and Now More Beyond. Read that here!
Drumline Warmups vs. Exercises: What’s the Difference, and When Should You Use Each?
If you’ve ever been handed a packet of drumline music labeled “EXERCISES,” only to find another packet labeled “WARMUPS,” you might be wondering: aren’t they the same thing? Spoiler alert, they’re not. And if you’re serious about clean hands, tight ensemble, and maximizing rehearsal efficiency, understanding the difference is more than just semantics.
Let’s break it down.
What Is a Drumline Exercise?
A drumline exercise is a detailed, focused breakdown of a specific skill. Think of it as a deep dive into one concept: timing, diddles, rolls, flams, heights, hand speed, you name it.
-
Exercises tend to isolate and exaggerate one technique at a time.
-
They’re designed to give the brain and body a complete understanding of a topic from every angle.
-
They’re not necessarily short. Some are a few bars. Some are full-page monsters.
-
Memorization is optional, depending on your group’s workflow and packet size.
-
In early-season camps, they’re gold for aligning technique and approach.
In short: exercises teach the how and why behind your drumming.
What Is a Drumline Warmup?
A warmup is not the same as an exercise, it’s a summary. Warmups are built from the ideas you’ve already mastered in exercises. They’re not there to teach. They’re there to remind, reactivate, and prepare.
-
Warmups get the blood flowing and reconnect your brain to familiar mechanics.
-
They tend to be shorter and faster-paced than exercises.
-
Many warmups blend technique with show-style phrasing to bridge into rehearsal seamlessly.
-
They’re often memorized because they’re used every day.
Bottom line: warmups are quick-hit reminders of bigger lessons, like Spark Notes for your hands.
What Actually Happens When You Warm Up?
Physically, warming up increases blood flow to the muscles, raises tissue temperature, and improves nerve response time. Playing cold means your hands aren’t ready, your muscles are stiff, your fine motor control is slower, and your risk of injury or bad reps goes up.
Mentally, warming up gets you into the drumming headspace. It switches you from “off” to “on,” aligning your mind with your hands and syncing your timing with the line.
How to Use Exercises and Warmups Throughout the Season
Early Season (Camps, First Rehearsals)
Start heavy with exercises. This is where technique gets built and refined. Think of it as laying bricks, you don’t rush that part.
-
Use exercises to teach everything from grip to stroke types.
-
Warmups should support those exercises, but not replace them.
-
Teach players how to think about playing, not just how to play.
Mid to Late Season (Closer to Performances)
Shift gears. Your technique should already be set, now it’s about consistency.
-
Prioritize warmups that reflect concepts already taught in exercises.
-
Use them to activate, unify, and transition into show music.
-
Shorter, more intentional warmups save time while keeping hands in shape.
-
Revisit exercises occasionally to clean up fraying technique.
By this point, warmups become the workhorse of your rehearsal, not the encyclopedia.
Analogy Time: The Three-Part System
Think of your season like learning a language.
-
Exercises are like grammar lessons. They’re slow, thorough, and sometimes boring, but essential.
-
Warmups are your daily conversation practice. Faster, fluid, and rooted in what you’ve already learned.
-
Show music is the full novel. It uses all the vocabulary and grammar, but with expression, art, and timing.
By the end of the season, you’re not diagramming sentences anymore, you’re speaking fluently. The exercises gave you the rules. The warmups kept you fluent. The show is the result.
What If You’re Teaching Beginners?
For younger or less experienced groups, you might want to simplify to a two-part system:
-
Use exercises as your warmups, they’ll double as both teaching and warming.
-
Write show music to be a musical extension of those exercises, simple, clean, and attainable.
This keeps your approach streamlined and prevents overwhelming less experienced players.
Writing Warmups That Reflect Your Show Music
By midseason, your warmups shouldn’t just keep hands moving, they should bridge directly into the show. That means your warmups need to start sounding and feeling like the music your line is actually performing. If you’re still doing symmetrical double-beat reps in late October, you’re leaving progress on the table.
Here’s how to write warmups that mimic show performance without turning into full-on etudes:
1. Use Subdivision Counts (“Duts”) Instead of a Tap-Off
Your show doesn’t start with a click or a loud tap. It starts with awareness, internal pulse, and subdivision, so your warmups should too. Duts help the line hear and feel the timing before playing. Plus, it’s a great chance to reinforce ensemble listening and count structure in a way that directly connects to show rep.
2. Sticks In = Better Habits Between Reps
Drumlines don’t typically hang out with their sticks up in the air between phrases in a show. Yet somehow, every warmup rep ends with players freezing like mannequins. Instead, bring sticks in or down to the sides after each rep, just like you would in performance. It’s a small visual habit, but it reinforces show discipline and transitions.
3. Don’t Always End on Count 1
Show phrases rarely end cleanly on downbeats. Neither should all your warmups. Mix it up:
-
End some warmups on the upbeat before count 1.
-
Let others flow through count 1 to mimic push-through moments.
That unpredictability helps your players develop awareness beyond blocky rep phrasing, because real music breathes, pushes, and pulls.
4. Build in Asymmetry, Especially for the Left Hand
Show music isn’t symmetrical. You rarely get perfect right/left balance. In fact, your weakest hands usually get exposed. So:
-
Start some warmups on the left hand.
-
Include uneven groupings where one hand gets more mileage than the other.
-
Design certain reps to favor the left to build it up without calling attention to it.
This trains a more performance-ready sound and hand balance, not just a symmetrical practice muscle memory that vanishes in the show.
5. Don’t Turn Your Warmup Into an Etude
Tempting as it is to get musical and clever with your warmups, resist the urge to write a mini-concert piece. If your warmup starts to sound like a movement from a percussion ensemble show, you’ve missed the mark. A warmup should reinforce one or two ideas in a quasi-musical, abbreviated context.
That means:
-
Don’t chase variety just for the sake of it.
-
Stay laser-focused on technique reinforcement.
-
Use show-style phrasing, not show-level complexity.
If your warmup teaches, activates, and echoes the feel of the show, without stealing time or turning into art, you’re doing it right.
Read more about the Performance-Ready Method here!
Final Thoughts
Exercises and warmups each serve a distinct purpose. Exercises are your teaching tools. Warmups are your maintenance tools. Show music is your artistic expression.
Don’t confuse the three, use them together, intentionally, and at the right time in your season. Your hands (and your staff) will thank you.
Now go check out some free warmups here!
You can also pay what you want for a 326-page pre-built drumline and pit warmup packet here!
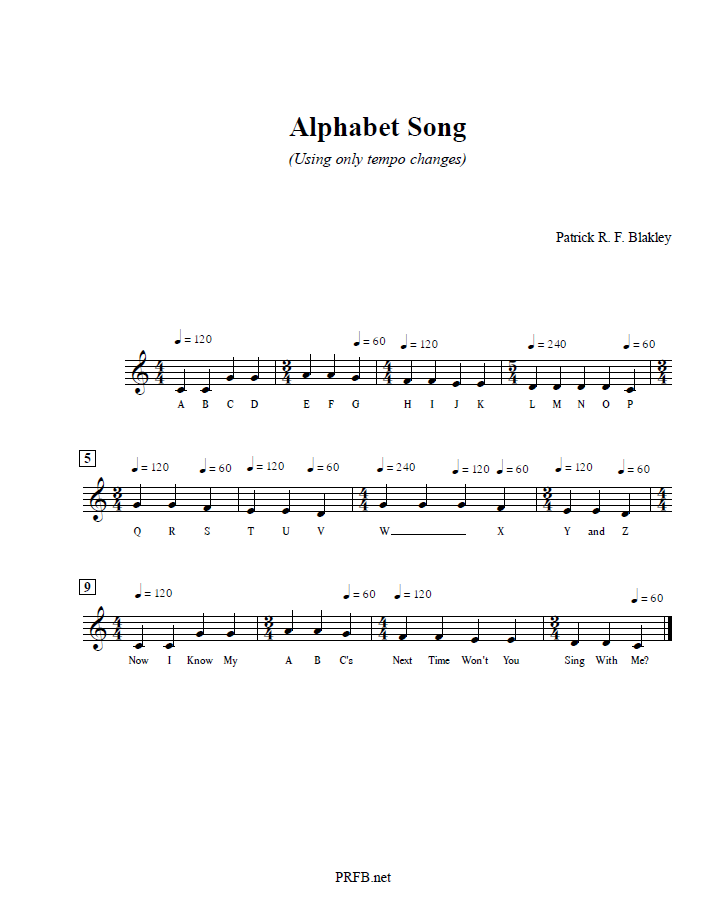
Easy as A-B-C, Right?!
This simple song is known throughout the United States (and beyond). The rhythms are pretty basic and the song is perfect for introducing kids to music! Now, what if we got rid of the rhythm completely? Would the song sound the same? Well, yes, if you constantly changed the tempo throughout the song too! Below is a fun example of the A-B-C song using tempo to indicate the timing instead of using rhythm notation. Have fun with this one y’all!
Steering Wheel Rhythms (Continued)
Six More Songs to Play on Your Steering Wheel!
In the past, I’ve written out some basic rhythms for songs with interesting riffs or patterns. Today I’m unloading six more! The songs in this post include Bugz by Pete Peterson, I Am Colossus by Meshuggah, two sections of Dance Yourself Clean by LDC Sound System, Deliverance by Opeth, and Alien Hip Hop by Planet X. Have fun hammering out these rhythms on everyone’s favorite percussive instrument: The steering wheel! Maybe just don’t do it while you’re driving!

This is one of my all-time favorite drum tracks! Travis Orbin throws down some of the best ambidextrous drumming I’ve ever seen and makes this music magical! This notation is from the middle section that repeats a very long syncopated pattern in such a cool way. I love the guitar chord changes and short to long tones halfway through!
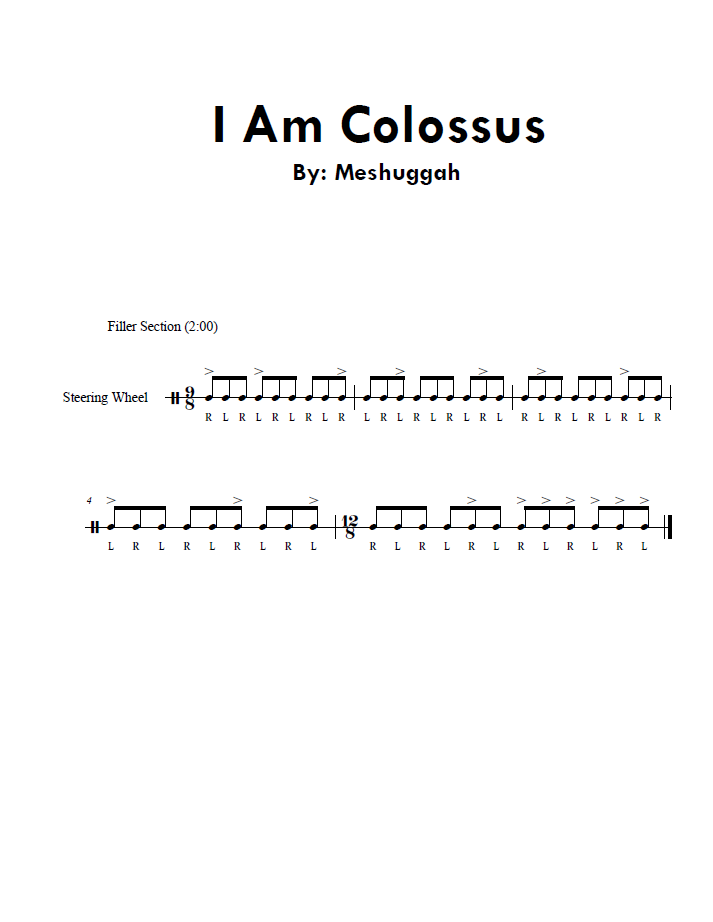
This is a track that my friend wanted to know the rhythm notation for, so I’m including it here for everyone who wants it. Meshuggah is known for their creative rhythms and I even featured another one of their tracks on a previous Steering Wheel Rhythms post (Gods of Rapture)!
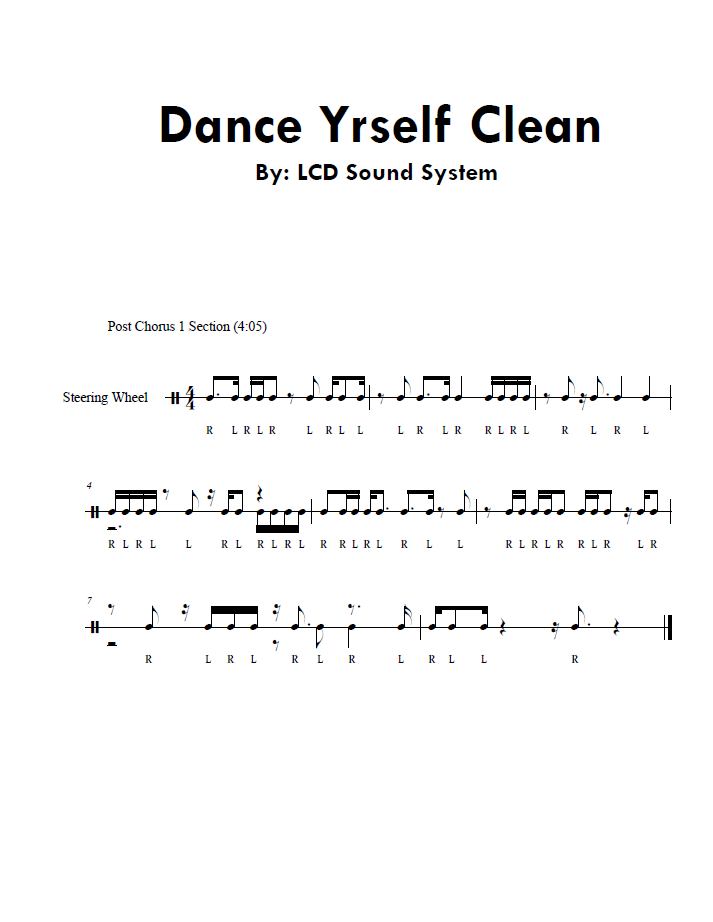
This song is so fun I had to include it here twice! The interlude pieces with the synth were just begging for me to write out the rhythms. To my surprise they’re slightly different each time, so here’s the first one and below you can find another!
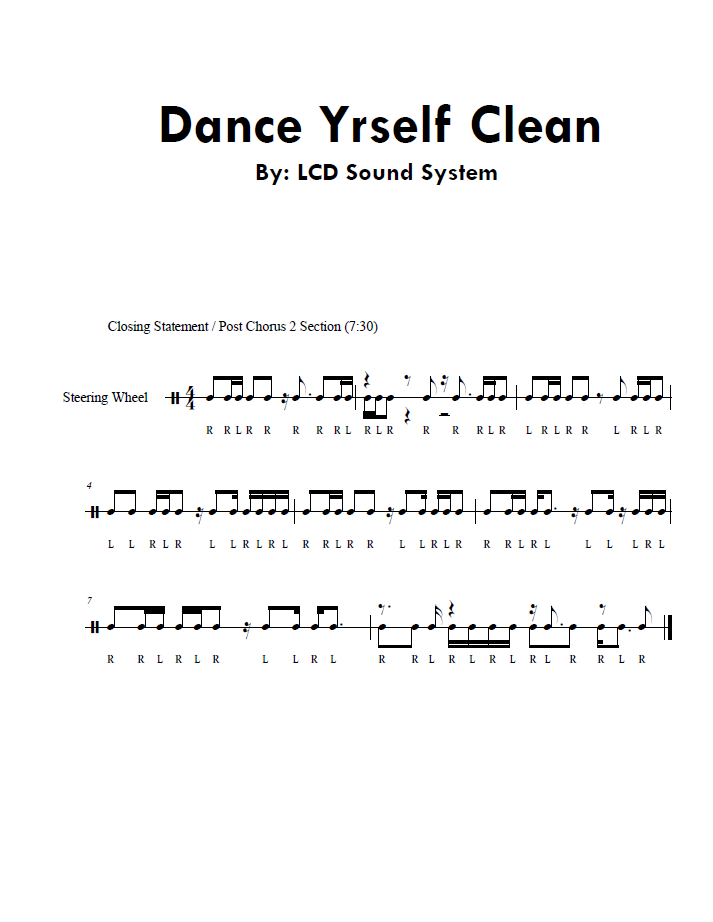
This is the second interlude section from this song because it’s so fun! I also included some of the connective bass synth tones under the staff that can either be used for reference or you can just play them all together. Enjoy!
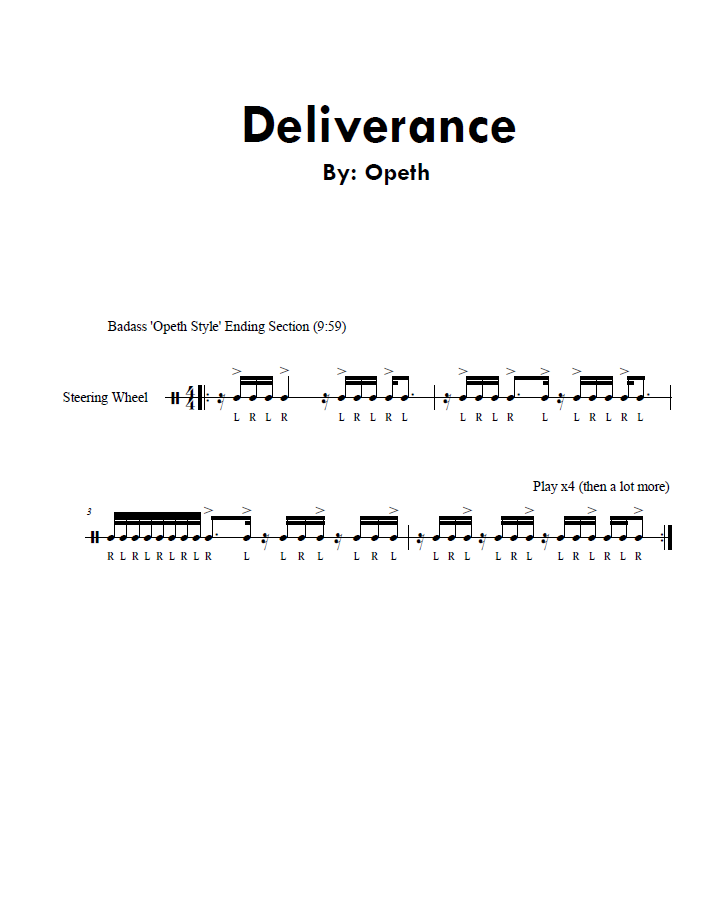
This has got to be my favorite song outro of all time! Opeth is known for this style outro and Deliverance is the best of the best. After such a long song it culminates in such a fantastic way with rhythms that start off the beat and push well over the barline (even including an awesome ostinato too). Hell yeah!
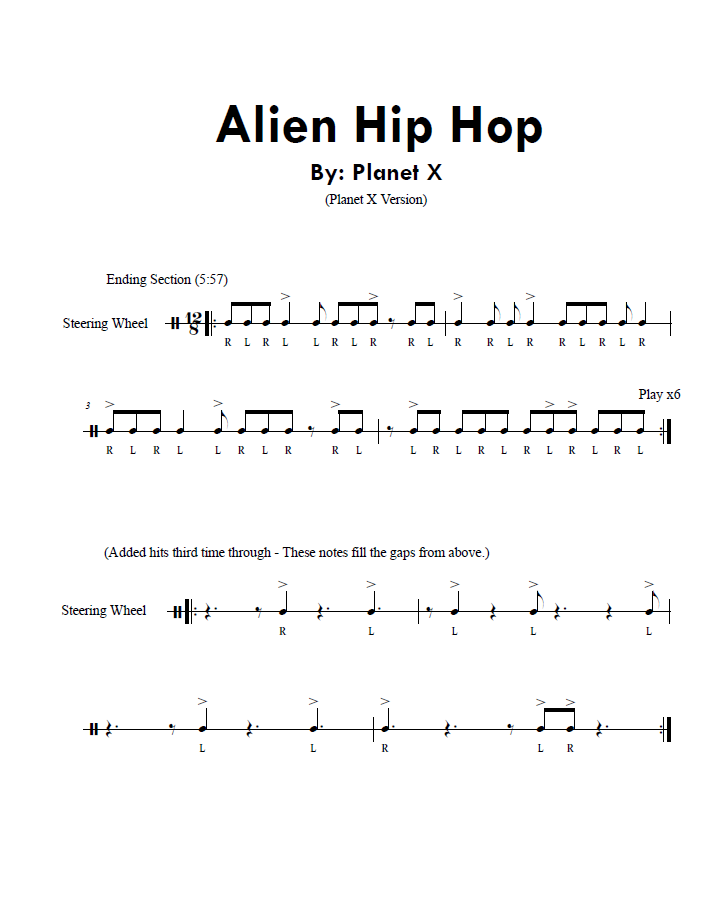
This version is the Planet X recording of Virgil Donati’s original piece on the Serious Young Insects album. I love the way these rhythms are put together by all the instrumentalists and Virgil on drums glueing both parts together at the end. How he does this I have no idea, he is the most technical drummer I’ve ever seen and for that he’s my all-time favorite!
Keep a look out for more Steering Wheel Rhythms in the future! If you’d like to make a request please feel free to use the contact link at the top of the page. I love writing out rhythms, and I think it’s fun that you don’t need to know any pitches to play these cool parts on your steering wheel. Thanks for checking out all six of these great rhythmic creations!
Drumset setup and tuning service for the Syracuse area!
Proper setup, lubrication, tuning, cleaning, polishing, and much much more!
![]()
Unlock the full potential of your drumset with our expert drumset setup, tuning, and cleaning services. A well-tuned drumset is essential for achieving the best sound and performance. Sometimes setting up a new drumset can be very intimidating. For beginners, you may not even know the optimum way to set up the kit. Fear not! Your drumset will not only be set up properly, it’ll be cleaned, polished, lubricated, tuned, and can even be repaired if there are any small issues! All of this is included in the standard price! But that’s just the beginning: If you need to replace things like drumheads, bass drum beaters, snare wires, tone rings, drumsticks, or even your bass drum muffle pillow, that can be done during the visit, plus even more! Whether you’re a beginner or a seasoned drummer, this comprehensive tuning service is performed by an experienced drum tech who will tailor your drumset to your unique style and preferences. Your drumset area will also be left neat and tidy so you can just sit down to play right away without having to clean anything up afterward.
Lesson students: Your drum tuning service is 50% off!
(Current students must be active and have a minimum of 1 hour completed lesson time to qualify. Limit 1 per household.)

Are you a business or commercial site that needs a drumset tuning and cleaning service? Look no further! Full services are offered to schools, churches, studios, theaters, clubs, bars, and any other business location with drums! Maintaining your commercial drumset is crucial, especially with big shows or performances on the horizon. Make sure your drums deliver top-notch sound quality when it matters most. I understand the unique demands of different venues and provide customized solutions to meet your specific needs. From regular maintenance to pre-performance checkups, your drumset will always be stage-ready. Ensure flawless performances and outstanding sound with these professional drumset services for commercial settings. Schedule your one-time or recurring appointment today and take your commercial drumset to the next level!
The general service area is available on the left. Services are offered outside this area but may add a small time/fuel surcharge for more distant appointments. Please feel free to reach out with any questions about our services or coverage area. The current service area radius is 8.5 miles from the studio.
I’m a drum tech and have been performing/servicing drums for over 30 years! I’ve performed across the country with groups from rock bands to drum and bugle corps. I’ve won competitive drumming contests at the local, state, and national levels! Currently, I’m a music judge for the NYSFBC and is a certified percussion judge for Winterguard International.
Once you submit your information through our drum tuning and service form you’ll receive an official estimate through email within about 24 hours. Standard pricing includes setup, cleaning, polishing, lubrication as needed, tuning, and some minor repairs for things like tension rods, lug nuts, claws, or snare throws. Any add-on items you’d like to include will be calculated at the time of service (things such as new drumheads, drumsticks, tone rings, bass drum beaters, snare wires, or bass drum tone pillows). There are NO hidden fees and the price estimate will not change if no add-on items are selected. You will NOT be pressured into buying any additional items! The price on your estimate is not only the lowest price of anyone in Greater Syracuse, but it’s the lowest price I can find anywhere online in any city!
Sign up for your drum kit setup and tuning services here!
Drumset Setup and Tuning Service FAQ
What is included in your drumset setup service?
The drumset setup service includes positioning and securing your drums, cymbals, and hardware to ensure optimal playing comfort and performance. I also check all minor components for any needed adjustments and ensure everything is securely fastened and with the ideal placement.
How do you tune a drumset for the best sound?
I tune drumsets by adjusting the tension rods on each drumhead to achieve the desired pitch and resonance. I use my well-trained and experienced ears to ensure precise tuning for each drum, tailored to your playing style and musical genre. For example, snare drums are tuned entirely to your pitch preference and toms are tuned to specific intervals based on style or genre. Electronic tuners and torque keys can be negatively affected by seized tension rods or imperfections in the drum heads, where a professional tuner’s ears never lie!
How often should I have my drumset tuned?
For commercial settings, it’s recommended to have your drumset tuned every few months or more frequently if they’re played regularly. Frequent tuning ensures your drums sound their best and helps prolong the life of your drumheads. This can seem intimidating for residential customers, so for in-home tunings I can help teach you how to tune the drums yourself which will be much more beneficial for you!
Do you offer on-site drumset setup and tuning services?
Yes, I provide on-site drumset setup and tuning services. I will come to your location to set up and tune your drumset, ensuring it’s ready for rehearsals, recordings, or performances.
What types of drumsets do you service?
I service all types of drumsets, including beginner’s kits or professional acoustic setups. Please note that I do not service or troubleshoot electronic drumsets.
How long does a drumset tuning session take?
A typical drumset tuning session takes about 1-2 hours, depending on the complexity of your setup and the specific tuning needs of your drums. The service work is thorough and each instrument and playing surface is also cleaned and prepped before tuning begins. Minor repair work may take longer if the kit needs a little TLC before tuning as well.
How much does drumset setup and tuning cost?
Drumset setup and tuning services are very competitively priced. Please submit a request for a detailed estimate based on your specific needs and location.
Can you help with drumhead selection and replacement?
Absolutely! I can recommend the best drumheads for your style and sound preferences and provide replacement and tuning services to ensure optimal performance. Please let me know ahead of time and I can even bring new batter drumheads with me to your service appointment! (Note: new drumhead installs are an optional add-on item and will add to the final cost.)
Why is professional drumset tuning important?
Professional drumset tuning ensures that your drums sound their best and are tuned to suit your playing style and musical genre. It also helps prevent damage to drumheads and hardware, extending the life of your drumset!
What should I expect during a drumset setup and tuning appointment?
During a drumset setup and tuning appointment, I will assess your current setup, make necessary adjustments, clean/polish each playing surface, make minor repairs if possible, and then tune each drum to achieve the best sound. I also offer tips and advice on maintaining your drumset and can even provide training for you to have more confidence tuning the drums yourself!
![]()
Return to SyracuseDrums.com for drum lessons, practice space rental, and setup/tuning services
Drumline, Mallet, & Drumset Practice Space Rental Is Here!
A rehearsal space for percussionists of every sort!
Finding a place to practice drums is hard! Luckily you live near Syracuse, NY and the perfect practice space is available nearby! SyracuseDrums.com offers our climate-controlled studio as a practice space rental through a Proctored Practice Session. What does that mean? A proctored practice session is like a drum lesson without the actual lesson. An instructor will let you into the studio, make sure you have everything you need, answer any questions you have, and then leave you to practice on your own. Through proctored practice sessions there is no formally prepared lesson material, just what you bring to the session to practice on your own. Proctored practice session prices are affordable and are 50% off normal lesson prices! Space may be limited, so reserve your sessions today!
 The best part of renting a practice is a focused environment which gives you a distraction-free environment where drummers can concentrate solely on honing their skills. Another benefit of the Syracuse practice space is noise control since renting a dedicated practice space allows you to play without disturbing your neighbors or household members (ideal for those living in apartments or shared spaces). Equipment availability means that you don’t need to buy any expensive drumsets or electronic gear and you definitely don’t have to transport it between locations just to practice! Community engagement is a benefit that most don’t consider, you’re networking with other drummers which is a huge perk for musicians looking to connect! Performance preparation: practice spaces offer a venue for drummers to prepare for performances, rehearsals, or recording sessions in a professional setting. The space also offers inspiration and creativity! Being in a different environment can spark new ideas and creative approaches to drumming, leading to musical growth and exploration.
Finally, one of the biggest benefits is having a regular schedule! Having a dedicated practice space encourages drummers to establish a regular practice routine, leading to more consistent progress and skill development.
In addition to all that, proctored practice sessions offer real-time help and support if needed!
Click here to sign up for the Syracuse practice space rental!
Preview the Proctored Practice Session Venue Space Rental Agreement
Click here to view the studio lessons terms and conditions
Drum Practice Space Frequently Asked Questions
What are the operating hours for the drumset practice space?
The drumset practice space is available during the week from 5:30pm through 8:30pm depending on studio availability.
How can I book a drumset practice space?
You can easily book a practice space through the online booking system.
Where is your drumset practice space located?
The practice space is conveniently located in North Syracuse and is conveniently accessible from most areas of Greater Syracuse. Free street parking is always available.
What types of drumsets are available for use?
We offer high-quality drumsets from top brands like Yamaha drums and Sabian cymbals, suitable for all skill levels from beginners to professionals. Each drumset is complete with digital music stands and a phone holder for your music and reference material.
Are there any additional instruments or equipment available?
Yes, the facility includes additional equipment such as mallets like marimba or xylophone and bells or glockenspiel. Marching drums such as snare drum, tenor drums, and bass drum are also available. Lastly, several styles of concert snare drum are also available. Latin instruments such as cajon, djembe, talking drum, udu, bongos, and more are available for specific applications as needed.
Do you provide practice pads and metronomes?
Yes, practice pads, metronomes, and other essential practice tools to enhance your rehearsal sessions are available upon request. The only thing you should bring is a pair of drumsticks and maybe some headphones to plug in if desired. (The studio does offer drumsticks for sale if needed.)
How much does it cost to rent the drumset practice space?
Our rental rates are currently $25 for 50 minutes to any current lesson students with 4+ hours of lesson time. Practice sessions are paid by month and you can pay for as many as you’d like up front to lock in your price for the future!
Can I cancel or reschedule my booking?
Yes, you can cancel or reschedule your booking before your scheduled session. Please refer to the rental agreement for more details.
What are the noise and volume regulations in the practice space?
The practice space is set up with sound-dampening materials and will contain the sound to a certain extent. The town’s code has a restriction on volume, but this should not be a problem for customers. That being said, the studio drums should be played in accordance with how you are taught in your lessons. This is why practice space rental requires a 4-hour minimum lesson duration which allows you to understand the right way to play the drums which will avoid noise issues or possible damage to the drumsets or equipment.
Are food and drinks allowed in the practice space?
No food or drinks are allowed inside the practice room to maintain the equipment’s condition. However, there is a designated lounge area with free refreshments like water and soda.
Is there a minimum age requirement to use the practice space?
Practice space rental is available to anyone at least 18 years old who have at least 4 hours of lesson time completed. Minors must be accompanied by an adult.
What measures are in place to ensure the safety of users?
The facility is equipped with security cameras, and a proctor is always on-site during operating hours to ensure your safety. Additionally, proctors will check in with customers as needed during the session to answer any percussion questions or give advice as needed. A proctor will always be available if needed.
Is your drumset practice space accessible for people with disabilities?
Yes, our facility is fully accessible and does not have any steps or stairs. Please just indicate any specific needs prior to your session and accomodations can easily be made!
![]()
Return to SyracuseDrums.com for drum lessons, practice space rental, and setup/tuning services
Buy The Best Drumsticks & Percussion Gear With This Great Checklist!
Drumsticks and mallets sorted by percussion section:
This checklist of percussion essentials will help you find the best drumsticks and be prepared for anything related to drumming: Drumset, drumline, or concert percussion! These items are sorted by section, so check out what you might need by your instrument. Check the gear out below…
Photo credit: Leah Hetteberg
Drumset / Concert:
The Innovative Percussion drumset drumsticks are perfect for withstanding the durability test of the drumset and cymbals! These drumset drumsticks are good quality drumsticks for beginners and seasoned drummers alike. Designed for use on the drumset, these sticks have a nice steady taper and pronounced bead with a diameter that is standard for the industry (5A and 2B). A drum pad is a great investment for practicing at home without a drumset! You can simply use a pillow, or your bed, but the drum pad would be a little bit more realistic option, especially for working on good technique habits! You might also want a nice quality drumstick bag if you plan to bring multiple pairs of sticks to and from your lessons. The Innovative Percussion stick bag has several interior pockets for your sticks and is made of heavy-duty material that will keep your drumsticks safe!
In addition to the above items, you might want to buy a binder or folder, perhaps with some page protectors, a notebook, and a pencil. Drum keys are definitely a must-have item if you own your own drumset at home, this is how you tune each drum head. Everyone should also consider downloading a good phone metronome app.
Some other drumset items you may find useful would be a standalone metronome so you don’t have to rely on a phone app or worry about damaging it, a pair of cheaper headphones to practice with your metronome, a phillips head screwdriver for tuning your snare strainer, a quick and easy water bottle, a bright backpack that’s easy to find (for traveling to lessons or other locations with your gear), and a 14″ drum mute to put on your home’s snare drum and use it as a practice pad!
Snareline:
The IP FS-BK snare sticks are the marching snare drum best drumsticks because of their flattened bead. This flat bead allows the most surface area to contact the drum head when played. These will be your primary sticks and, though the minimum is one pair, you should consider buying at least two pairs. Tape these sticks in white stick-tape to cover the entire stick (minus the bead). Taping the whole stick allows for protection against back sticking rimshots as well as overall implement protection. The IP-1 General snare sticks are basically a smaller version of the main FS-BK stick (well, actually, the FS-BK’s are a bigger version of the IP-1 sticks). The bead is also flattened and will contact the drum head with the most surface area. Do not tape this stick at all, the stick is only used for lighter passages and will not be used for rimshots.
In addition to the above items, you will want to buy a binder with page protectors, a dot book, and a pencil. It is also recommended that you have a drum pad with you to use (but not required). High-tension drum keys are also optional as you may or may not be tuning your own drum (section leaders will decide this). A decent towel is always a good idea for when it rains and the equipment gets wet (and it will definitely rain), might want to get a light rain jacket too, and maybe even a dry bag for your sensitive gear! Everyone should also consider downloading a good phone metronome app.
Some other marching band essentials that you may find useful, but are not required would be an Information Packet book for a full understanding of how rehearsals are run, a standalone metronome so you don’t have to rely on a phone app or worry about damaging it, a pair of cheaper headphones to practice with your metronome, a phillips head screwdriver for tuning your snare strainer, a quick and easy water bottle, a bright backpack that’s easy to find, a 14″ drum mute to put on your drum and use it as a practice pad, and if you’re feeling adventurous you can buy a GoPro with a drum mount! (Check out the GoPro and drum mount article to learn even more.)
Tenorline:
The TS-2 nylon-tipped tenor sticks are the best drumsticks for tenor drummers since they allow for a much more controlled sound compared to the FT-1 tenor mallet. These are both great implements for tenor drummers to use. The sticks are easier to move because they are lighter and more versatile but the mallets create a full quality sound at every dynamic. Use the white stick tape to cover below the tip to about 1/3 of the way down the neck. You will not be playing rimshots with the butts of these sticks so they do not have to be taped the whole way down. These sticks should last an entire season so you may get by with only ordering one pair.
In addition to the above items, you will want to buy a binder with page protectors, a dot book, and a pencil. It is also recommended that you have a drum pad with you to use (but not required). High-tension drum keys are also optional as you may or may not be tuning your own drum (section leaders will decide this). A decent towel is always a good idea for when it rains and the equipment gets wet (and it will definitely rain), might want to get a light rain jacket too, and maybe even a dry bag for your sensitive gear! Everyone should also consider downloading a good phone metronome app.
Some other marching band essentials that you may find useful, but are not required would be an Information Packet book for a full understanding of how rehearsals are run, the Quadratics book for a better understanding of the tenor drums, a standalone metronome so you don’t have to rely on a phone app or worry about damaging it, a crescent wrench for adjusting and fixing your tenors or carrier, a pair of cheaper headphones to practice with your metronome, a quick and easy water bottle, a bright backpack that’s easy to find, a full tenor drum pad to be able to practice at home without bringing the drums, a 12″ drum mute to put on drum 2 and use it as a practice pad, and if you’re feeling adventurous you can buy a GoPro with a drum mount! (Check out the GoPro and drum mount article to learn even more.)
Bassline:
When you are given your mallets (shown below) you should tape them using white, or sometimes black, stick tape. Tape from below the bead/mallet head to about 1/3 the way down. We don’t ever use the butts of these mallets so protection below that point is not necessary. The bassline uses black tape so that the mallet can easily be seen from far away, this makes it easier to correct if it is not in the center (allowing for earlier muscle memory).
In addition to the above items, you will want to buy a binder with page protectors, a dot book, and a pencil. It is also recommended that you have a drum pad with you to use (but not required). High-tension drum keys are also optional as you may or may not be tuning your own drum (section leaders will decide this). A decent towel is always a good idea for when it rains and the equipment gets wet (and it will definitely rain), might want to get a light rain jacket too, and maybe even a dry bag for your sensitive gear! Everyone should also consider downloading a good phone metronome app.
Some other marching band essentials that you may find useful, but are not required would be an Information Packet book for a full understanding of how rehearsals are run, a standalone metronome so you don’t have to rely on a phone app or worry about damaging it, a crescent wrench for adjusting and fixing your drum or carrier, a pair of cheaper headphones to practice with your metronome, a drum pad for practicing and auditioning for the snare or tenor line, drumsticks for practicing and auditioning for the snare or tenor line, a quick and easy water bottle, a bright backpack that’s easy to find, and if you’re feeling adventurous you can buy a GoPro with a drum mount! (Check out the GoPro and drum mount article to learn even more.)
Pit / Front Ensemble / Concert Mallets:
You will want to buy a binder with page protectors, and a pencil. Timpanists may want to purchase their own tuner, but is not a requirement. Drum keys are optional as you may or may not be tuning the accessory drums (section leaders will decide this). A decent towel is always a good idea for when it rains and the equipment gets wet (and it will definitely rain), might want to get a light rain jacket too, and maybe even a dry bag for your sensitive gear! Everyone should also consider downloading a good phone metronome app.
Some other marching band essentials that you may find useful, but are not required would be an Information Packet book for a full understanding of how rehearsals are run, a standalone metronome so you don’t have to rely on a phone app or worry about damaging it, a pair of cheaper headphones to practice with your metronome, a drum pad for practicing and auditioning for the drumline, drumsticks for practicing and auditioning for the drumline, a quick and easy water bottle, a bright backpack that’s easy to find, and if you’re feeling adventurous you can buy a GoPro with a drum mount! (Check out the GoPro and drum mount article to learn even more.)
Please make sure you have the right items you need. Practicing with the wrong implements, or without certain implements, will negatively affect the learning process because your technique could drastically change. You should also make sure to have spare sticks or mallets because they may break or become damaged due to the nature of the activity.
If you have any questions feel free to contact me!